Getting Started
Installation
Clipper is a single .py file — part of the Marker Madness suite. No installer, no extra packages — the only prerequisite is a free Python 3 install.
Before You Start — Python 3
DaVinci Resolve only runs .py scripts if Python 3 is installed on your machine. Download the free installer from python.org/downloads. If you feel more comfortable getting it through Resolve directly, open the console (Workspace → Console) — when Python isn’t detected, Resolve shows a link to the same Python 3 download.
- Download Clipper 1.2.py from the suite download page.
- In Finder, navigate to:
~/Library/Application Support/Blackmagic Design/DaVinci Resolve/Fusion/Scripts/Utility/
On Windows: C:\ProgramData\Blackmagic Design\DaVinci Resolve\Support\Developer\Scripting\Scripts\Utility\
- Drop the
.py file into the Marker Madness subfolder (or directly into Utility — either works).
- Open DaVinci Resolve with a project and timeline loaded.
- From the top menu choose Workspace → Scripts → Utility → Marker Madness → Clipper 1.2.
Tip
Clipper must be launched from inside DaVinci Resolve — it reads the active project and timeline through Resolve's scripting bridge. It will not work if launched directly from Finder or Terminal.
Interface
The Main Window
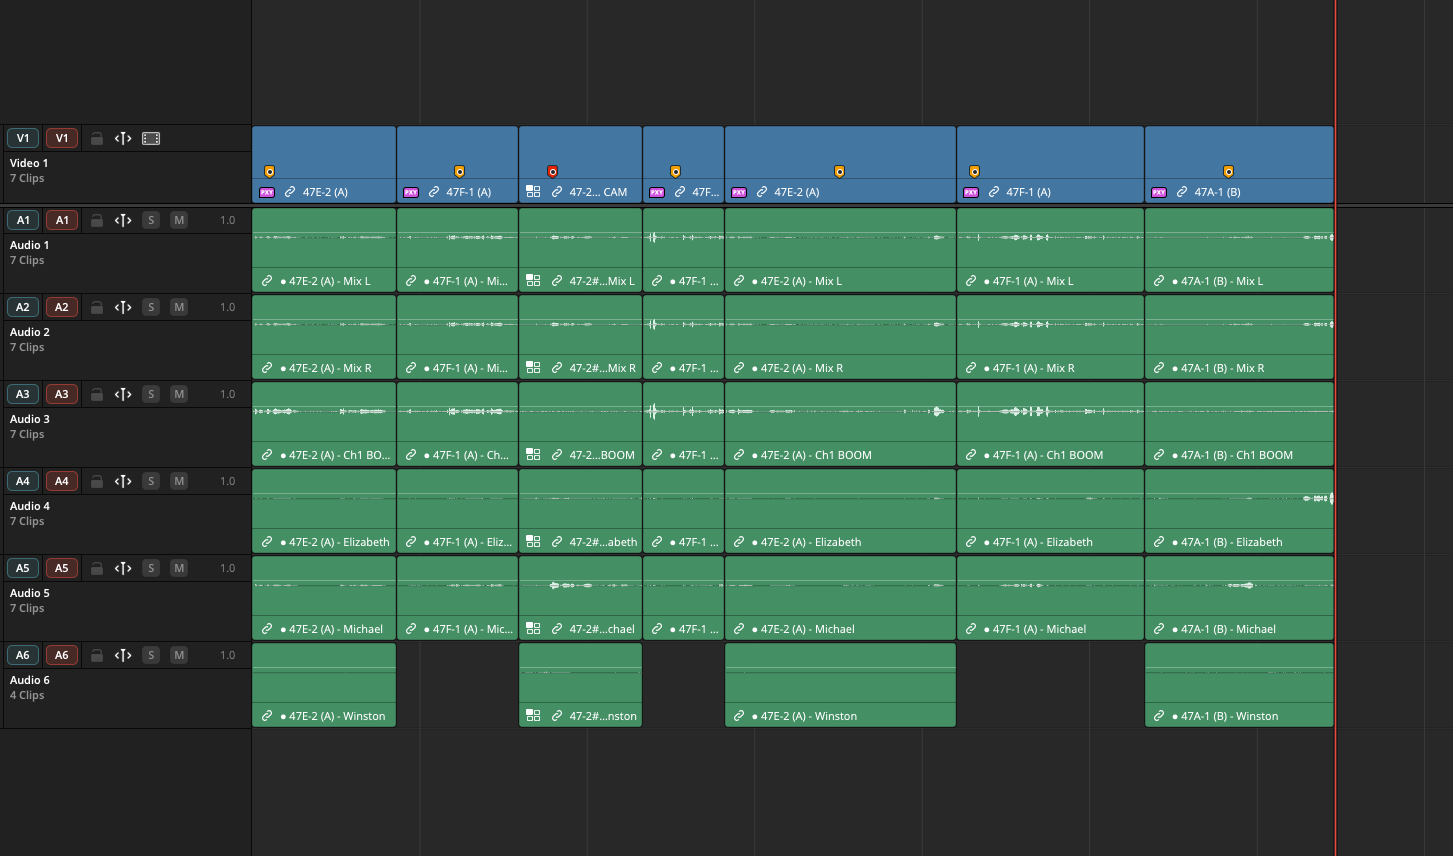
The window is split into three zones: the header showing the connected project and timeline, the Settings panel where you configure the batch, and the Preview table showing every subclip that will be created before you commit.
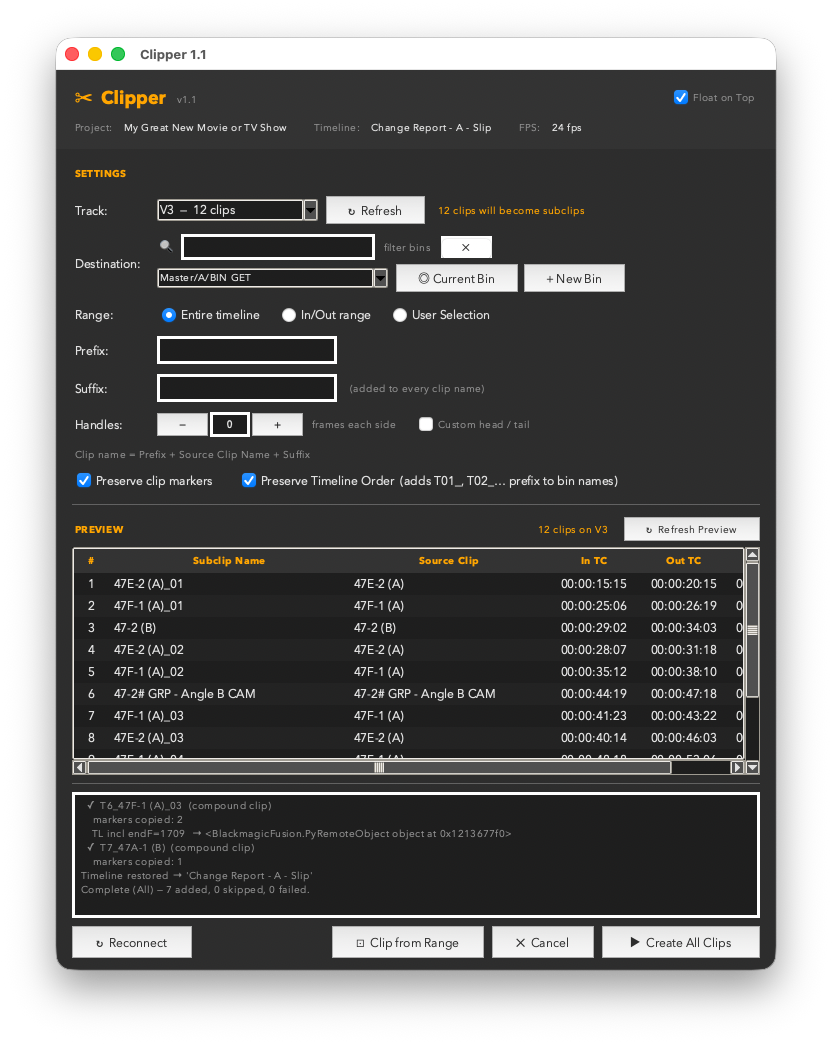
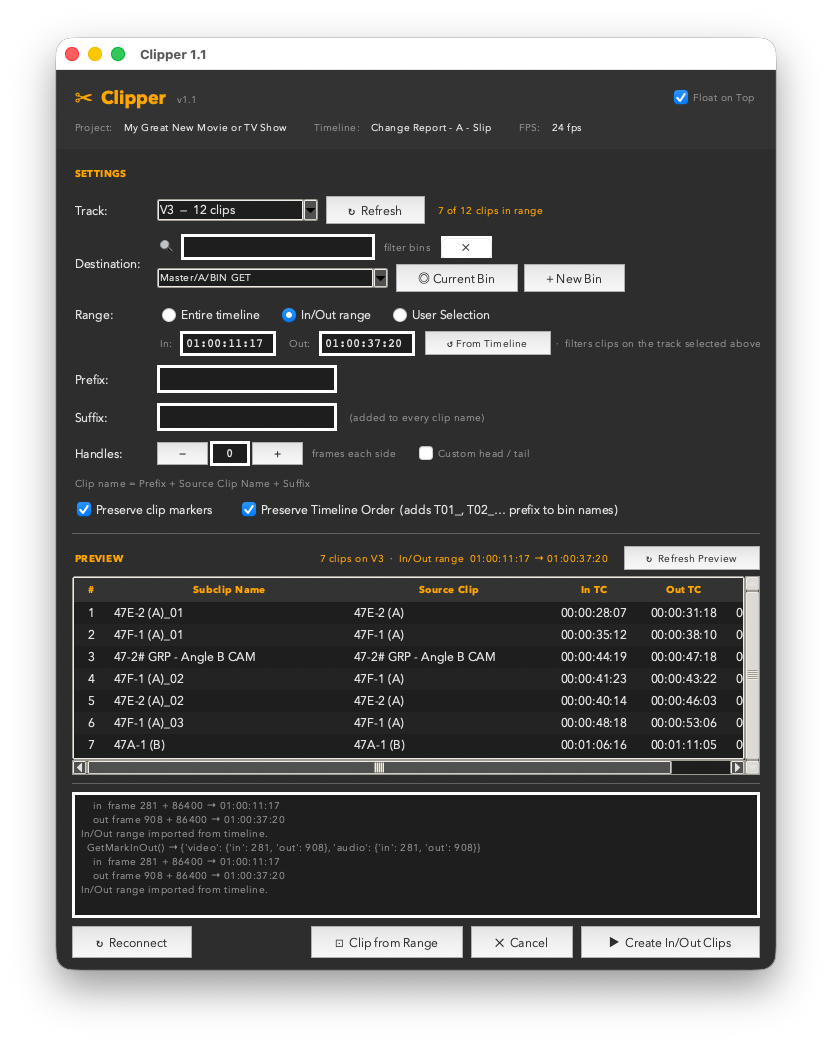
Clipper v1.2 — connected to a timeline with In/Out range active, the preview table showing every clip in the marked range before anything is created.
Header
The header always shows the currently connected Project, Timeline, and FPS. If any of these are wrong, click ↻ Reconnect in the footer or use the Refresh button — Clipper will re-read the current Resolve state.
Auto-refresh: Clipper polls Resolve every 4 seconds and updates automatically when you switch timelines. It also refreshes the moment you click back into the window from Resolve. The manual Refresh button is always there if you need it.
Settings
Track
The Track dropdown lists every video and audio track in the current timeline. Video tracks appear first (V1, V2…), followed by audio (A1, A2…). Each entry shows the track label and the number of clips on that track.
The track dropdown lists every video and audio track with its clip count. Selecting a different track rebuilds the preview instantly.
When you select a track, the preview rebuilds immediately to show what will be created. The clip count label to the right of the dropdown updates to reflect the current selection — and in In/Out range mode it switches to show how many of those clips fall within your marked range.
Tip
Click ↻ Refresh next to the dropdown after making edits in Resolve (adding or deleting clips on a track) — the list will re-read the timeline and update the clip counts.
Settings
Destination Bin
The Destination row controls where your subclips land in the Media Pool.
| Control | What it does |
|---|
| Bin dropdown | Lists every bin in your Media Pool, including nested subfolders. The full folder path is shown so you can pinpoint exactly where subclips will go. |
| Filter field | Type to filter the bin list. Useful when your Media Pool has dozens of bins — just type a few letters to narrow it down. |
| Current Bin | Locks the destination to whichever bin is currently selected in Resolve's Media Pool. Changes dynamically as you switch bins in Resolve. |
| + New Bin | Prompts for a name and creates a new bin inside the currently selected destination. The new bin is immediately selected as the destination. |
Settings
Range Filter
The Range row controls which clips on the selected track get turned into subclips. There are three modes.
The three range modes — Entire Timeline, In/Out Range, and User Selection — shown with In/Out Range active.
Entire Timeline
The default. Every clip on the selected track becomes a subclip. The Create button reads ▶ Create All Subclips.
In/Out Range
Only clips whose position on the timeline overlaps the In/Out range you specify will be included. Clips that sit entirely outside the range are skipped.
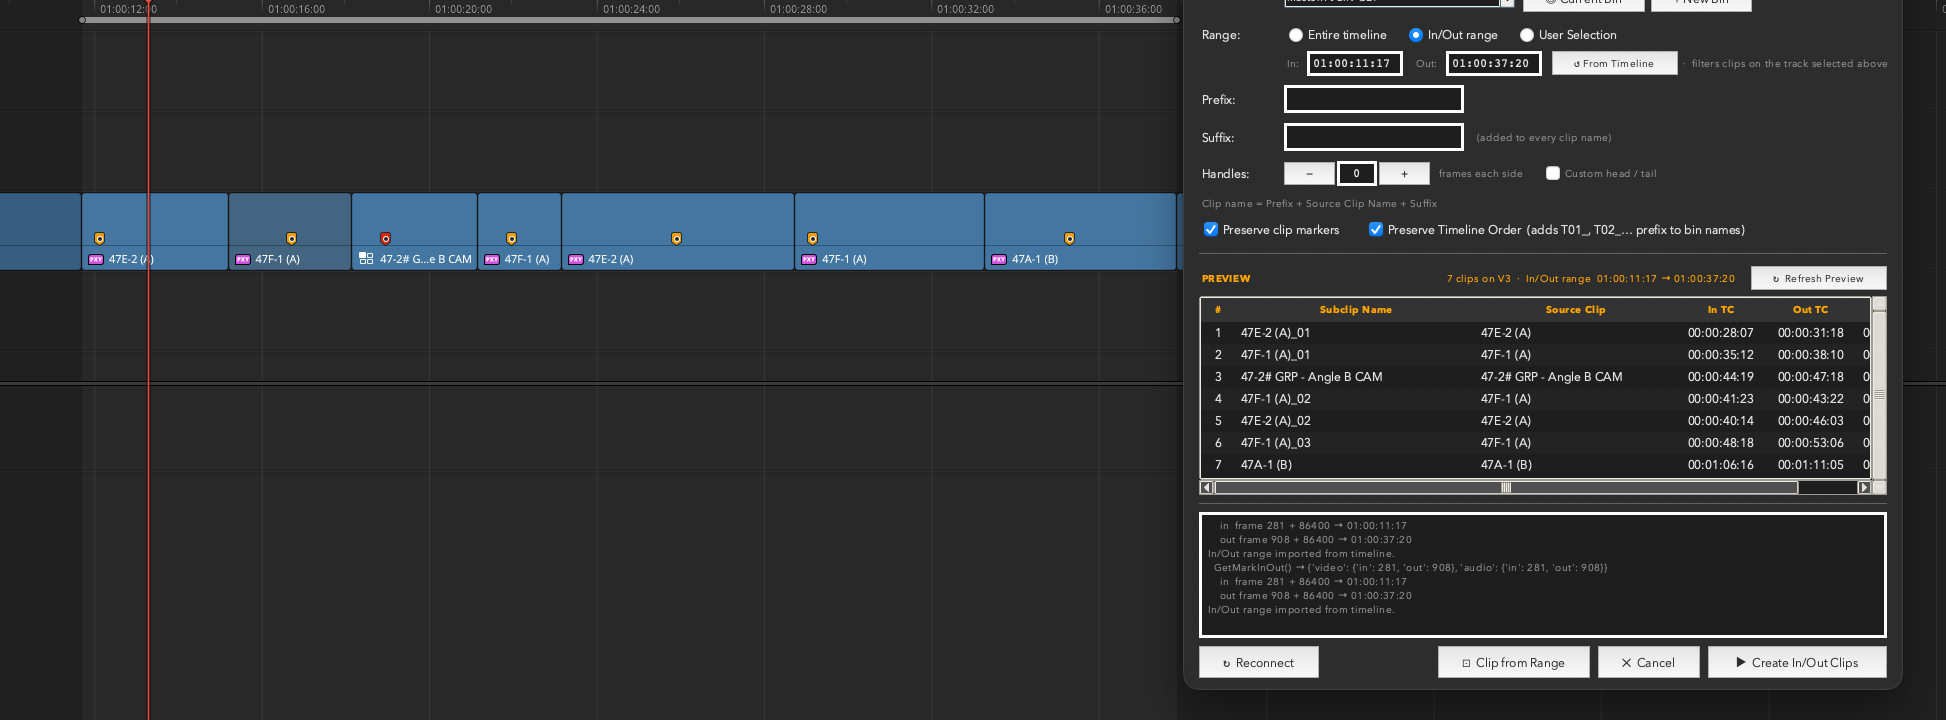
In/Out range mode — Clipper floats alongside the Resolve timeline. Orange markers are visible on each clip; the range filters the preview to just the clips within the marked window.
When you select In/Out range, Clipper immediately tries to read the In and Out marks from the current Resolve timeline. If marks are set, the TC fields populate and the preview filters instantly. If no marks are set yet, the TC fields stay empty — just press I and O in Resolve to set them, then click ↺ From Timeline to import them.
- In / Out fields — type a timecode directly in
HH:MM:SS:FF format, or use ↺ From Timeline to auto-fill.
- ↺ From Timeline — reads the current In/Out marks from Resolve. Use this any time you change the marks.
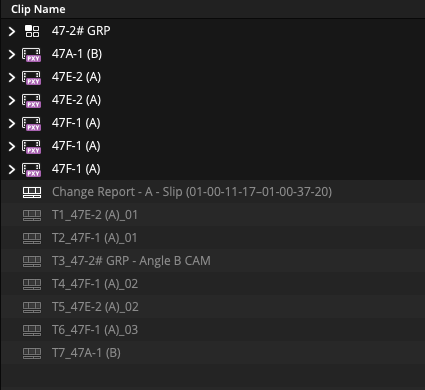
The Media Pool after a Clipper run — source clips at top, the assembled Clip from Range sequence, and the individually ordered subclips (T1–T7) in the destination bin.
Tip
The clip count label next to the Track dropdown changes to "X of Y clips in range" when In/Out mode is active — a quick sanity check that your range is picking up the right clips before you commit.
User Selection
Click any rows in the preview table to select specific clips. Clipper automatically switches to User Selection mode. Only the selected clips will be created when you hit the button — which changes to ▶ Create Selected (N), showing the count of selected rows.
Switching to User Selection keeps the current preview intact — if you were in In/Out range mode, the filtered list stays, and you can pick specific clips from within it. Switching back to Entire Timeline or In/Out range clears the row selection and rebuilds.
Tip
Use Shift-click to select a range of rows and Cmd-click to toggle individual rows on and off.
Settings
Prefix & Suffix
Every subclip is named after its source clip. The Prefix and Suffix fields let you wrap that base name with extra text applied to the whole batch at once.
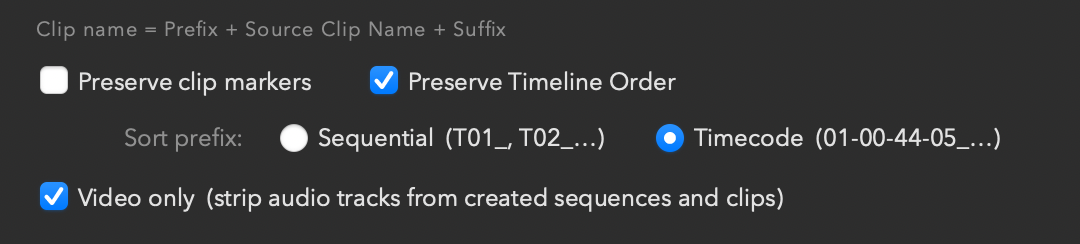
The naming and options row — add a prefix or suffix to every clip name, set handle frames, and enable Preserve Clip Markers or Preserve Timeline Order (T01_, T02_… prefix).
The naming formula is always: Prefix + Source Clip Name + Suffix
If two clips on the track share the same source clip (e.g. the same B-roll used twice), Clipper auto-disambiguates: the first becomes ClipName_01, the second ClipName_02, and so on. This is applied after the prefix and suffix, so you'll get PREFIX_ClipName_01.
Example
Scene prefix SC42_ + source clip Interview_Wide → subclip named SC42_Interview_Wide. The preview updates as you type so you can see the result before committing.
Settings
Handles
Handles extend the source In/Out points of each subclip beyond the cut edge — giving you extra media to work with in the subclip for re-cutting, transitions, or VFX work.

Custom head/tail handles enabled — 5 frames head and 8 frames tail set independently for each side of every subclip.
| Control | What it does |
|---|
| − / + / field | Sets the number of handle frames added to both the head and tail of every subclip. Default is 0. |
| Custom head / tail | Unlocks separate head and tail fields when checked. Use this when you need asymmetric handles — e.g. 8 frames head and 4 frames tail. |
Handles are drawn from the source media. If a clip sits at the very beginning of the source reel with no pre-roll, the head handle will be clamped at 0 automatically.
Settings
Options
Three checkboxes below the handles row apply to every clip creation method — individual subclips, User Selection, and Clip from Range sequences.
The options row — Preserve Clip Markers and Preserve Timeline Order are checked here; Video Only sits on the row below.
Preserve Clip Markers
When checked, any markers placed on a clip in the original timeline are copied to the newly created subclip or sequence clip. Marker colour, name, note, and duration are all preserved.
If you added handles, the marker offsets are shifted forward by the head handle frame count automatically — so a marker at the first frame of a clip stays at the first frame of the clip's content in the new subclip, not at the first frame of the handle.
For native subclips created with CreateSubClip (Resolve 18–20), markers are added as source markers on the new Media Pool item. For sequences created with Clip from Range, markers are added as clip markers on each timeline item in the new sequence.
Preserve Timeline Order
When checked, Clipper prepends a zero-padded position number to every subclip name — T1_, T2_… or T01_, T02_… depending on the total clip count. This forces the Media Pool bin to sort clips in the order they appeared on the timeline, left to right, regardless of the source clip names.
This is especially useful when the same source clip appears at multiple points in the edit — without the prefix, the bin would group all instances together by name. With the prefix, T03_SceneName and T11_SceneName stay in their correct positions.
Tip
The T-prefix plays well with Clip Renamer Pro — once your clips are ordered in the bin, use Clip Renamer Pro to strip the prefix or batch-rename them to whatever naming convention your workflow uses.
Video Only
When checked, all audio tracks are removed from any timeline or sequence Clipper creates. This is useful when you are pulling selects from a long-form edit and only need the picture — no dialogue, no music, no room tone.
Clipper deletes audio tracks from highest index to lowest after the sequence is built, so the removal is clean and does not shift any video content.
Individual subclips (native CreateSubClip): Video Only does not apply at the source subclip level. A subclip is a reference into the source media — audio linking happens when the subclip is placed on a timeline, not at the bin level. Use Clip from Range if you need a video-only sequence. Clipper will log a note when this option is set and individual subclips are being created.
Interface
The Preview Table
The preview table is a live read-only view of what Clipper will create. It rebuilds automatically when you change the track, range, prefix, suffix, or handles — and whenever Clipper detects a timeline change in Resolve.
The preview table with clips filtered to the In/Out range — subclip names, source clips, source In/Out timecodes, and durations. The log below shows API activity from reading the timeline marks.
| Column | What it shows |
|---|
| # | Row number — the order clips appear on the track from left to right. |
| Subclip Name | The exact name the subclip will be created with, including any prefix, suffix, and auto-disambiguation suffix. |
| Source Clip | The name of the Media Pool item the clip refers to. Clips flagged ⚠ no media (generators, titles, compound clips) will be skipped at creation time. |
| In TC | Source media timecode for the subclip's In point, including any head handle frames. |
| Out TC | Source media timecode for the subclip's Out point, including any tail handle frames. |
| Duration | Total duration of the subclip in timecode, including handles. |
Tip
The status line above the table tells you the clip count, the active track, and the current range. In In/Out mode it also shows the exact range timecode — "8 clips on V1 · In/Out range 02:01:45:05 → 02:02:01:03" — so you can verify the range at a glance.
Running the Batch
Creating Subclips
When the preview looks right, hit the main action button in the bottom-right corner. The button label tells you exactly what it will do:
| Button Label | What it creates |
|---|
| ▶ Create All Clips | A subclip for every clip in the preview (Entire Timeline mode). |
| ▶ Create In/Out Clips | A subclip for each clip that overlaps the marked In/Out range. |
| ▶ Create Selected (N) | A subclip only for the N rows you've selected in the preview table. |
While the batch runs, the button is disabled. A summary dialog appears when it's done, showing how many subclips were created, how many were skipped (no source media), and any failures.
Clips flagged ⚠ no media in the preview — generators, titles, compound clips — are always skipped gracefully. They don't cause the batch to fail; they're just reported in the summary.
Grouped Clips
Clipper can subclip grouped clips, but for more consistent and predictable results, flatten your grouped clips before running the batch. Grouped clips report their own start and end points which may not match what you see on the timeline — flattening first ensures the source in/out calculations are accurate for every clip.
Running the Batch
Clip from Range
The ⊡ Clip from Range button does something different from the main Create button. Instead of generating one individual subclip per clip, it collects every clip on the selected track that falls within your In/Out range and assembles them into a single new timeline sequence — placed as one item in your destination bin.
Set your In and Out marks in Resolve, choose a track, and Clip from Range assembles every clip in that window into one new sequence.
This is particularly useful when you want a clean sub-sequence of a larger edit — a scene, a passage, a selects section — without manually copying and pasting clips into a new timeline. Set your In/Out marks, pick a track, and click the button. Clipper does the rest.
How to use it
- In Resolve, press I and O to set In and Out marks around the clips you want to capture.
- In Clipper, switch the Range mode to In/Out Range and click ↺ From Timeline to import the marks. Confirm the clip count looks right in the preview.
- Choose your destination bin (or create a new one with + New Bin).
- Set any options you want — Preserve Clip Markers, Preserve Timeline Order, or Video Only.
- Click ⊡ Clip from Range. Clipper builds the sequence and places it in the bin.

The footer buttons — ⊡ Clip from Range (left) assembles a sequence; ▶ Create All Clips (right) creates individual subclips.
What gets created
Clipper creates a new DaVinci Resolve timeline — named after your current timeline with a timestamp suffix — and places it in the destination bin. The clips appear on the timeline in the same left-to-right order they were on the source track, with their original source media and in/out points intact.
The destination bin after a run — the Clip from Range sequence at top, followed by individually ordered subclips (T1–T7) created in the same pass.
Tip — Preserve Clip Markers
If Preserve Clip Markers is checked, any markers on the original timeline clips are copied to the corresponding clips in the new sequence. Marker positions are adjusted for any head handles so they land at the right frame in the subclip. Colour, name, note, and duration are all preserved.
Tip — Video Only
If Video Only is checked, Clipper removes all audio tracks from the assembled sequence after it is built. This is the recommended way to create video-only pulls — the individual Create buttons cannot strip audio from source subclips, but Clip from Range can because it creates a full timeline.
Getting true standalone clips from a range
Clip from Range creates a timeline sequence — one item in the bin. If you need true individual clips (one bin item per clip) rather than a sequence, there is a clean two-step workaround using Clipper and Resolve together:
- Use ⊡ Clip from Range to build the sequence as normal.
- Open the new sequence in the Resolve timeline. Lasso all the clips, then drag them directly from the timeline into any Media Pool bin.
When you drag clips from the timeline into a bin, Resolve converts each one into its own Media Pool item — source name, in/out points, and all. It is a couple of extra steps, but the result is identical to hand-creating each subclip individually.
The DaVinci Resolve scripting API does not support creating a single subclip that spans multiple source clips. Clip from Range works around this by assembling a proper timeline sequence instead. The lasso-and-drag step above is the bridge if you need individual bin items.
Compatibility
DaVinci Resolve 21 Beta Note
Clipper is fully compatible with DaVinci Resolve 18 and 19 (stable releases) using the standard CreateSubClip API, which creates traditional subclips with the scissors icon in your Media Pool.
DaVinci Resolve 21 (currently in beta as of Build 33) temporarily removed CreateSubClip from the scripting API. Clipper detects this automatically and falls back to CreateTimelineFromClips, which creates compound clips instead — timeline icons rather than scissors icons. They function identically for editing, but look different in the bin.
What to expect on Resolve 21 beta
Your subclips will appear as compound clip (timeline) icons in the Media Pool instead of subclip (scissors) icons. Everything else — naming, bin placement, source in/out points — works exactly as described. Once Resolve 21 reaches a stable release and restores CreateSubClip, Clipper will switch back to native subclips automatically with no change required on your end.
The summary dialog after each run will note which method was used, so you always know what was created.