Getting Started
Installation
Marker Madness is a single .py file. No installer, no extra packages, no admin rights required — the only prerequisite is a free Python 3 install.
Before You Start — Python 3
DaVinci Resolve only runs .py scripts if Python 3 is installed on your machine. Download the free installer from python.org/downloads. If you feel more comfortable getting it through Resolve directly, open the console (Workspace → Console) — when Python isn’t detected, Resolve shows a link to the same Python 3 download.
- Download Marker Madness 1.4.3.py from the link above.
- In the Finder, navigate to:
~/Library/Application Support/Blackmagic Design/DaVinci Resolve/Fusion/Scripts/Utility/
On Windows: C:\ProgramData\Blackmagic Design\DaVinci Resolve\Support\Developer\Scripting\Scripts\Utility\
- Drop the
.py file into that folder. Create a subfolder to keep things tidy if you like — the name doesn't matter.
- Open DaVinci Resolve. From the top menu choose Workspace → Scripts → Utility → Marker Madness 1.4.3.
- The window will open and immediately connect to the active timeline. You're ready to go.
Tip
Enable Float above Resolve in the right panel so the window stays visible while you work. On macOS it uses a smart stay-on-top: it floats above Resolve but drops back when you switch to any other app.
Interface
The Main Window
The window is divided into three horizontal zones: the toolbar at the top, the marker table in the center, and the right panel for preview and actions.
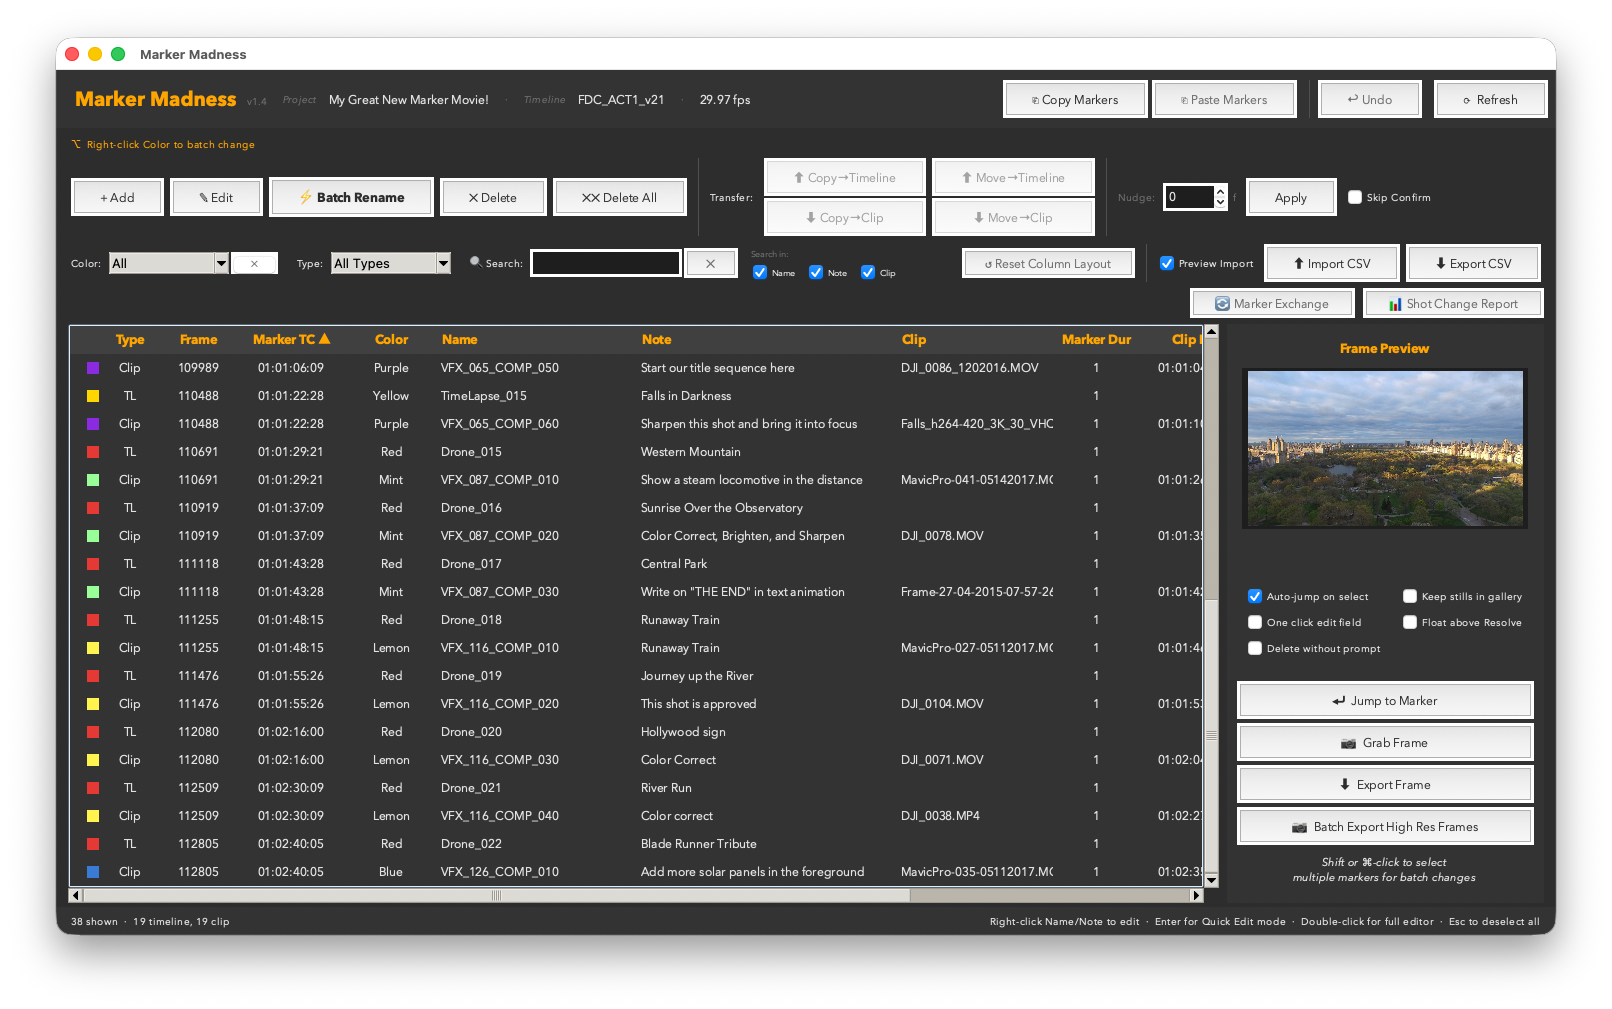
The main window showing a populated timeline with toolbar, marker table, and right panel.
Header Bar
The top strip shows the app name and version, the connected Resolve project and timeline name, and the detected frame rate of the active timeline.

The header bar — always shows which project and timeline you're working on, and at what frame rate.
Copy, Paste, Undo & Refresh
The first action row handles cross-timeline operations and history.


Copy & Paste Markers, and the Redo / Undo / Refresh controls.
- Copy Markers — copies the selected markers to an internal clipboard, preserving color, name, note, duration, and relative offset from the playhead.
- Paste Markers — pastes at the current playhead position. A dialog lets you choose: Timeline Ruler, or any video/audio track that has a clip at the paste position.
- Redo / Undo — steps forward or backward through the operation history. Undo reverses nudges, pastes, promotes, and demotes. Redo re-applies a step you undid.
- Refresh — re-reads all markers from Resolve. Happens automatically when you click back into the window from Resolve.
Marker Actions
The second row contains the core per-marker operations.

Left to right: Add, Edit, Batch Rename, Delete, Delete All — plus the right-click color hint above.
- + Add — adds a new marker at the current playhead position. A dialog lets you set color, name, note, and duration.
- Edit — opens the edit dialog for the selected marker.
- ⚡ Batch Rename — opens the Batch Rename panel (see Batch Rename).
- ✗ Delete — deletes the selected markers (with confirmation unless Skip Confirm is on).
- ✗✗ Delete All — deletes every marker currently visible in the table. Always asks for confirmation.
- Right-click Color — right-clicking any cell in the Color column opens a color picker to batch-recolor the whole selection instantly.
Transfer & Nudge
The third row handles promoting, demoting, and nudging markers.

Transfer buttons (left group) and Nudge controls (right) — move markers between the timeline ruler and clips, or shift them by a precise frame count.
- ↑ Copy / Move →Timeline — copies or moves selected clip markers up to the timeline ruler at the equivalent timecode.
- ↓ Copy / Move →Clip — copies or moves selected timeline markers down onto a clip. A track picker dialog lets you choose exactly which track to land on.
- Nudge — enter a frame count (positive or negative) and click Apply to shift all selected markers by that amount. Supports Undo.
- Skip Confirm — when checked, nudge and delete operations skip the confirmation dialog.
Filter & Search
The fourth row narrows the table view in real time — no Apply button needed.

Color and Type dropdowns, keyword search, Search In checkboxes, and Reset Column Layout — all combine live.
- Color dropdown — show only markers of one color. The ✕ button beside it resets to All instantly.
- Type dropdown — filter to All Types, Timeline markers only, or Clip markers only.
- Search box — matches against Name, Note, and Clip Name as you type.
- Search in checkboxes (Name / Note / Clip) — narrow which fields the search looks in.
- Reset Column Layout — restores the default column order and widths if you've dragged things around.
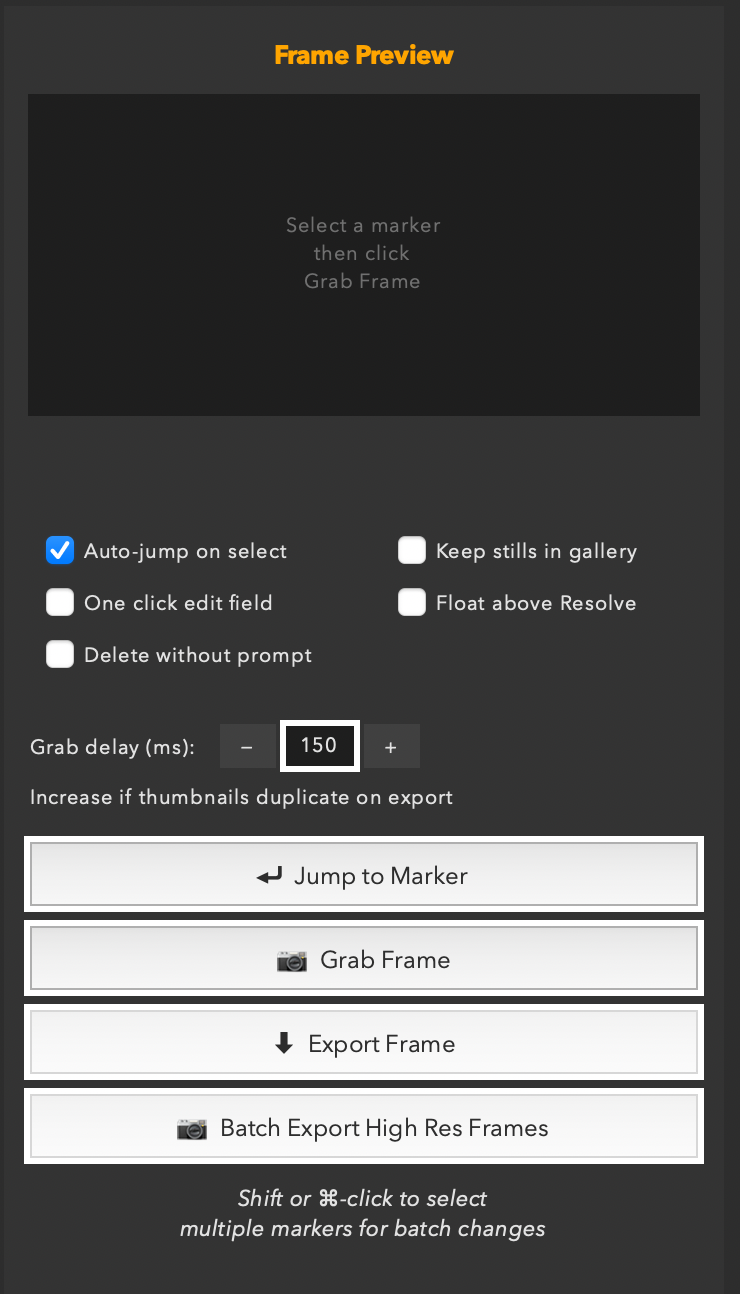
Import & Export
The fifth row gives access to CSV import/export and the advanced analysis tools.
Left to right: Preview Import toggle, Import CSV, Export CSV, Marker Exchange, Shot Change Report.
- Preview Import — when checked, a before/after preview dialog appears before any CSV import is committed.
- ⬆ Import CSV — import a CSV to create markers on the timeline (see Export CSV & HTML).
- ⬇ Export CSV — opens the Export Options dialog.
- 🔄 Marker Exchange — open the NLE exchange panel for Premiere Pro and Avid (see Marker Exchange).
- 📊 Shot Change Report — open the diff tool (see Shot Change Report).
The Marker Table
Every marker in the active timeline — clip markers and timeline (ruler) markers alike — appears in one unified table.
| Column | Description |
|---|
| Color dot | Visual color swatch. Right-click any selection to recolor. |
| Type | "TL" for timeline ruler markers, "Clip" for clip markers. |
| Marker TC | Absolute timecode position on the timeline. |
| Color | Color name text (also filterable by the Color dropdown). |
| Name | The marker's name. Click to edit inline. |
| Note | The marker's note/comment. Click to edit inline. |
| Clip Name | The name of the clip the marker lives on (blank for timeline markers). |
| Duration | Marker duration in frames. |
| Clip In / Clip Out | Timecode position within the clip's source media. |
| Clip Dur frames | Clip duration in frames. |
| Clip Duration | Clip duration as a timecode. |
Hidden Feature
Drag column headers left or right to reorder the table. Your column order is saved between sessions and carries into CSV exports — the export columns match exactly what you see.
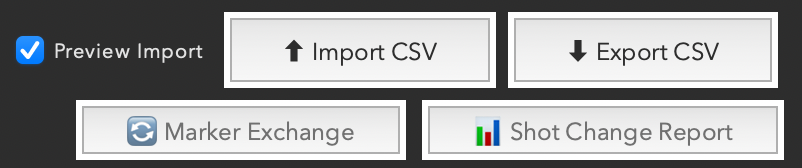
The Right Panel
The panel on the right side of the window contains the frame preview area, all option checkboxes, and the action buttons.
- Frame Preview — shows the still frame for the selected marker after a Grab Frame.
- Auto-jump on select — selecting a marker automatically moves the Resolve playhead to that timecode.
- Keep stills in gallery — when unchecked (default), grabbed stills are automatically deleted from the Resolve gallery after export.
- One click edit field — a single click on a Name or Note cell opens the inline editor immediately.
- Float above Resolve — keeps the window on top of Resolve (drops back when switching to other apps). Your on/off choice is remembered between sessions — turn it off once and it stays off.
- Delete without prompt — skips the confirmation dialog when deleting markers.
- Grab delay (ms) — the pause between seeking to a marker and grabbing its still. Increase for heavy or high-res timelines. Default 150ms; try 300–600ms if thumbnails repeat.
- Jump to Marker — moves the playhead to the selected marker without grabbing a frame.
- Grab Frame — captures the current playhead frame as a still.
- Export Frame — saves the currently previewed still as a PNG.
- Batch Export High Res Frames — exports stills for every selected marker in one automated pass (see Batch Export).
Navigation
Filtering & Search
The filter controls in Toolbar Row 2 combine live — every change immediately narrows the table. No Apply button needed.
- The Color filter dropdown shows only markers of the chosen color. Hit the ✕ button beside it to reset to All instantly — no need to open the dropdown.
- The Type filter lets you view only Timeline (ruler) markers or only Clip markers.
- The Search box matches against Name, Note, and Clip Name simultaneously. Use the three checkboxes (N / No / Cl) to narrow which fields are included — useful when you want to search clip names only without matching on notes.
Pro Tip
Filters also narrow the scope of exports. Set a color filter, then choose All visible markers in the Export dialog — you'll export only the filtered set without having to select anything manually.
Click any column header to sort by that column. Click again to reverse. A ▲/▼ arrow shows the active sort. Sort state is saved between sessions.
Editing
Quick Edit Bar
The Quick Edit bar is the fastest way to rename and annotate markers without touching the mouse. It appears as a compact bar between the table and the status line — activate it, type, and move on.

The ⚡ Quick Edit bar showing Name and Notes fields ready for keyboard input.
Activating
- Select a marker in the table, then press Return or Enter (including numpad Enter).
- The bar slides in below the table, the Name field is focused, and the current name is pre-filled.
While the bar is open
| Tab | Move from Name → Notes → back to Name (cycles) |
| Return / Enter | Save current row, move to next marker below |
| ↑ / ↓ | Save and jump up or down one row |
| Escape | Save and close the bar, return focus to table |
Changes are written to Resolve immediately when you move to another row or close the bar. Only changed fields are written — if you don't touch Notes, no unnecessary write happens.
Right-click inside either field for Cut / Copy / Paste / Select All.
Editing
Inline Editing
The Name and Note columns in the table are directly editable without opening any panel.
- Double-click any Name or Note cell to open a full-width edit box in place.
- With One click edit field enabled in settings, a single click opens the editor immediately.
- Press Return or Tab to save and close. Press Escape to discard.
- Right-click inside the edit box for Cut / Copy / Paste / Select All.
Inline editing is best for single corrections. For renaming many markers at once, use the Batch Rename panel.
Editing
Batch Rename
The Batch Renamer is a full naming engine. Open it with the Batch Rename button in the toolbar. It reads your current selection (or all visible markers if nothing is selected) and shows a live before/after preview for every row.
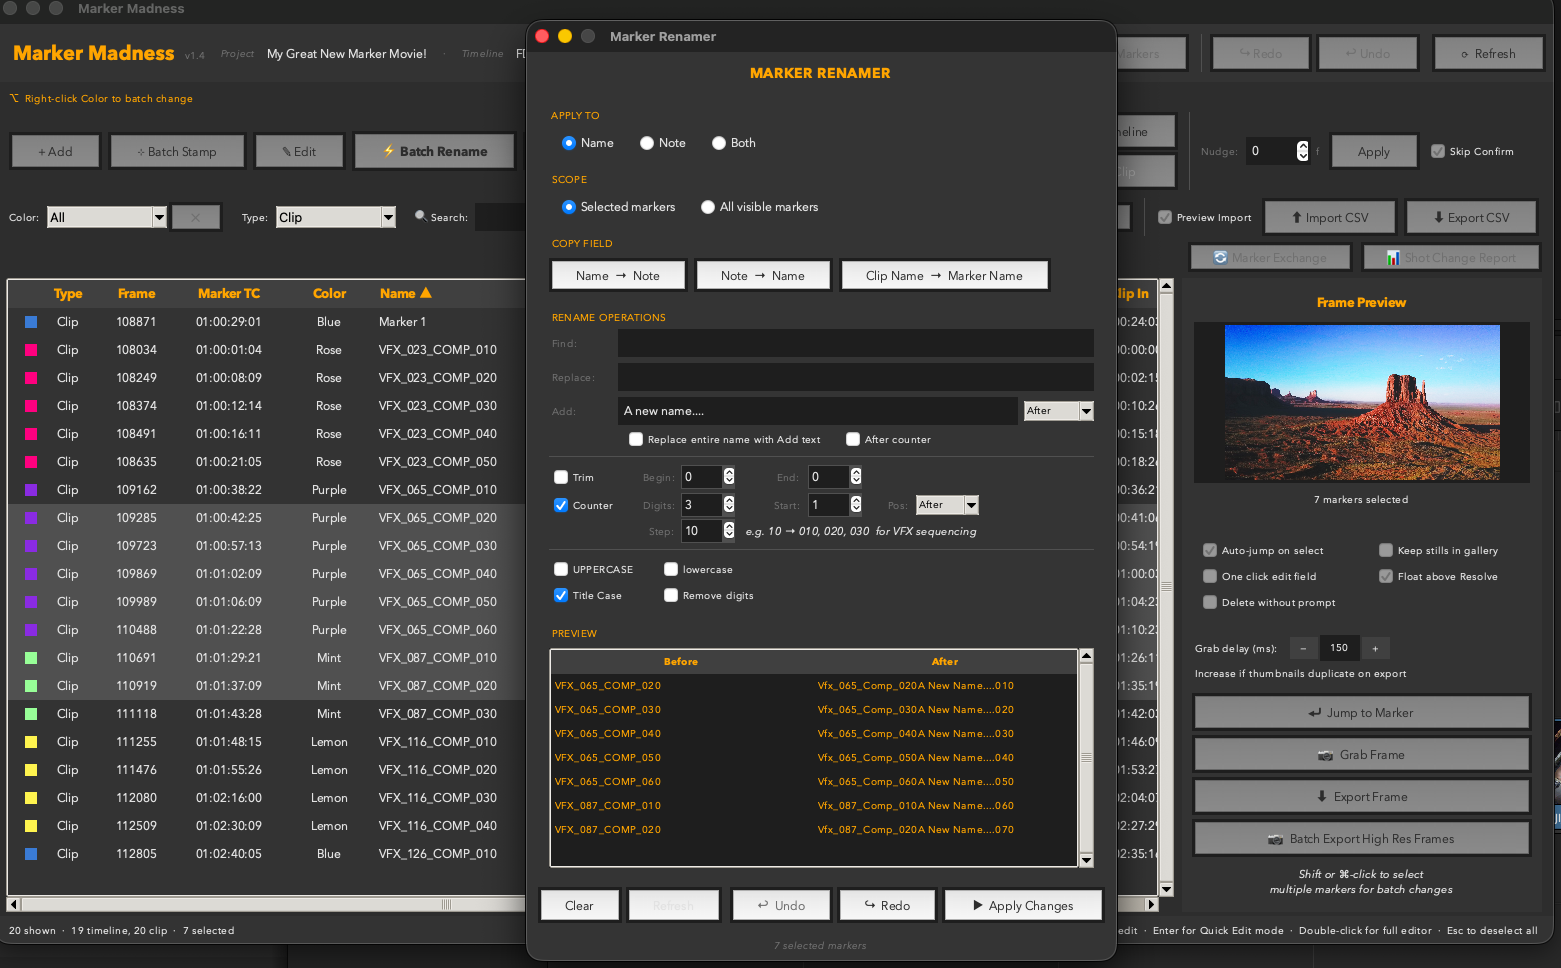
Batch Rename panel with a live preview showing the naming result for each marker before applying.
Operations (applied in order)
- Find / Replace — text substitution on the current name. Case-sensitive by default.
- Prefix / Suffix — add text before or after the name.
- Case — convert to Title Case, UPPER, lower, or leave unchanged.
- Trim — strip leading/trailing whitespace.
- Counter — append or insert an auto-incrementing number with configurable start, step, and digit count.
Counter — the essential trick
The counter has three settings: Start, Step, and Digits. Together they let you produce VFX-style shot numbering in one pass:
- Start:
1 Step: 10 Digits: 3 → produces 010, 020, 030…
- Start:
100 Step: 1 Digits: 4 → produces 0100, 0101, 0102…
The Position field controls where in the final name the counter appears: before the prefix, after the prefix, before the suffix, or after (the end). Choose After counter to place additional text after the number: ShotName_010_VFX in one step.
Tip
The preview updates live. Select different markers, click back into the Renamer — the preview refreshes automatically to show what those markers would be renamed to.
Undo
Every Apply push goes onto the undo stack. Click Undo in the toolbar immediately after to reverse. The undo stack clears when you hit Refresh or switch timelines.
Editing
Recolor Markers
Select one or more markers in the table, then right-click the Color column of any selected row. A color picker menu appears — choose a color and every selected marker is updated at once.
Hidden Feature
Right-clicking the Color column is the recolor shortcut. The context menu appears regardless of which row you right-click — only the selection matters.
Editing
Nudge
The Nudge control lives in Toolbar Row 1, next to the fps display. Enter a positive or negative frame count and click Nudge to shift all selected markers forward or backward by that many frames.
- Positive values move markers later in the timeline.
- Negative values move markers earlier.
- Nudge is undoable.
Nudge moves markers within their current context — a clip marker stays on its clip, a timeline marker stays on the ruler. It does not change the marker type.
Navigation
Jump to Marker
There are two ways to move the Resolve playhead to a marker's timecode:
- Auto-jump — enable Auto-jump on select in the right panel. Every time you select a marker in the table, the playhead moves there automatically.
- ⏎ Jump to Marker button — in the right panel, click this to jump to the currently selected marker on demand, regardless of the auto-jump toggle. Useful when you want to browse the table freely and only jump when you decide to.
Workflow
Copy & Paste Markers — Across Timelines, Tracks & Projects
Marker Madness includes a full cross-timeline clipboard for moving markers between sequences.
- Select the markers you want to move in the table.
- Click Copy Markers in Toolbar Row 1.
- Switch to the destination timeline in Resolve.
- Click back into Marker Madness — it auto-refreshes to the new timeline.
- Move the playhead in Resolve to the position where you want the markers to land.
- Click Paste Markers. A dialog appears asking where to place them:
- Timeline Ruler — markers land on the ruler at the offset from the copy position.
- Track list — any video or audio track that has a clip at the paste position is listed. Choose a track to paste as clip markers onto that specific clip.
Here's the part that surprises people: the clipboard lives in memory for as long as Marker Madness stays open — so you can paste across rulers, tracks, or even entirely different PROJECTS. Copy markers in one project, switch projects in Resolve, and paste into another. No CSV export, no tab-delimited files, no round-trips.
- Select your markers and click Copy Markers.
- Leave Marker Madness open.
- Switch to your other project in Resolve.
- Bring Marker Madness back to the foreground, position the playhead, and click Paste Markers — then choose the ruler or a track.
Frame Rates
Markers paste at the playhead plus their original frame offset. If both projects share the same frame rate, placement is exact. If the frame rates differ, the markers keep their spacing in frames but their real-time positions shift slightly — nudge them into place if needed.
Stills
Grab Frame & Preview
For any selected marker, you can grab the still frame from Resolve and preview it directly in the right panel.
- Select a marker. If Auto-jump is on, the playhead moves there automatically. Otherwise, click ⏎ Jump to Marker first.
- Click 📷 Grab Frame. Marker Madness temporarily switches Resolve to the Color page, grabs the still, returns to your current page, and displays the thumbnail in the preview area.
- Click ⬇ Export Frame to save the still as a PNG file.
High-Res Footage
If you notice the wrong frame being grabbed — typically the previous marker's frame — increase the Grab delay setting. The delay gives Resolve time to fully decode the frame before the grab fires. 150ms works for proxies; 300–600ms is safer for 4K RAW or effects-heavy timelines.
Export
Export to CSV & HTML Report
The Export dialog bundles three things in one shot: a CSV spreadsheet of your markers, an HTML report, and optionally still frame thumbnails for every marker.
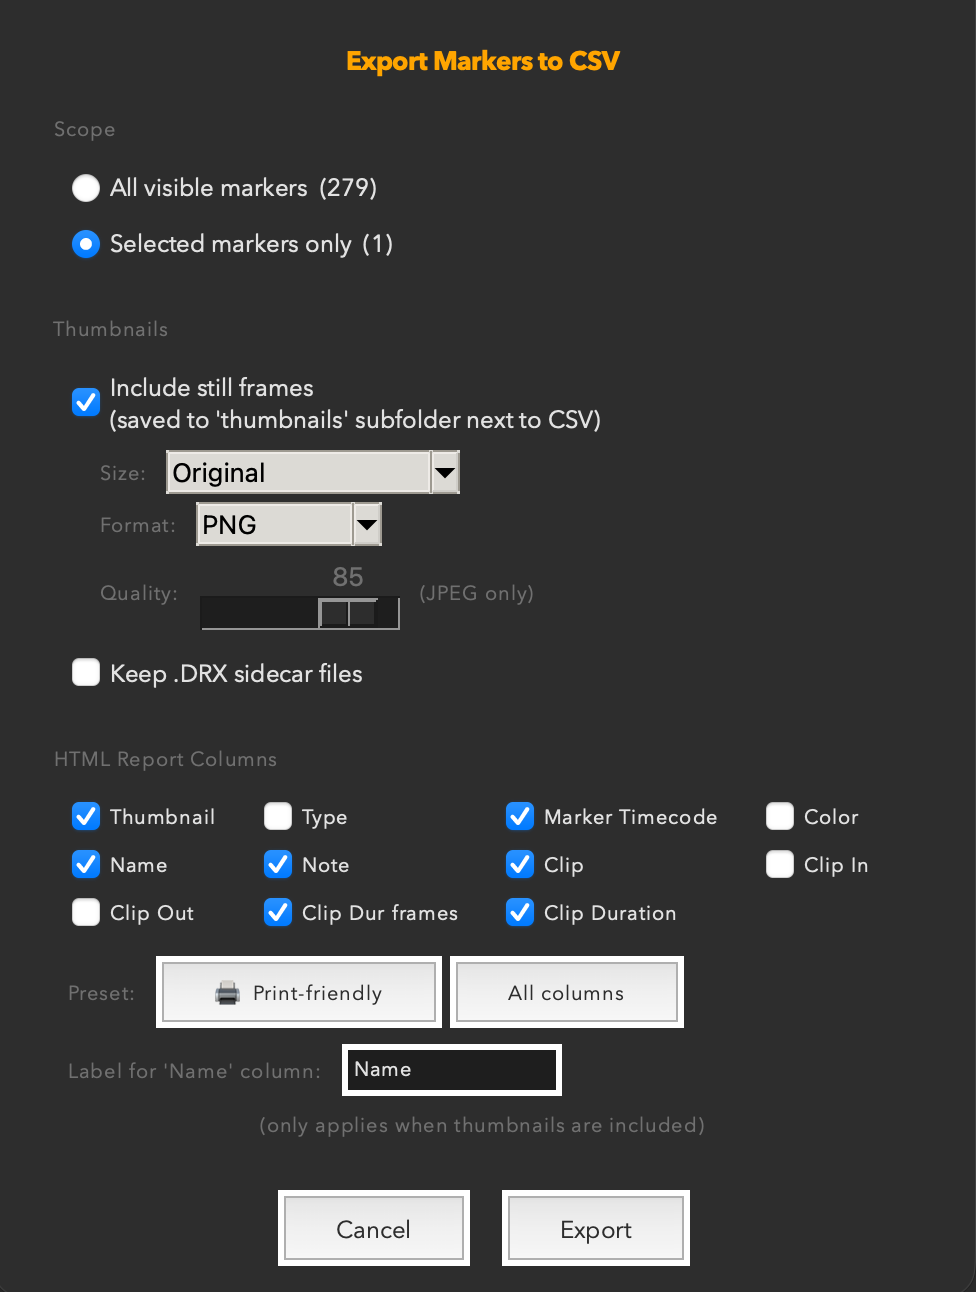
The Export Options dialog — choose columns, scope, thumbnail format, and presets before writing the CSV.
Scope
- All visible markers — exports whatever the table currently shows (respects active color/type/search filters).
- Selected markers only — exports only the highlighted rows.
Thumbnails
Check Include still frames to have Marker Madness automatically seek to each marker, grab a still frame from Resolve, and embed it in the HTML report. Thumbnails are saved to a thumbnails/ subfolder next to the CSV.
- Size — choose the maximum dimension (width or height) for each thumbnail.
- Format — PNG (lossless) or JPEG. JPEG adds a Quality slider.
- Keep .DRX sidecar files — Resolve generates a
.drx sidecar for each still. Uncheck to delete them automatically after export.
HTML Report Columns
When thumbnails are enabled, you can choose which columns appear in the HTML report. Enable only the columns you need — fewer columns print more cleanly.
- Click 🖨 Print-friendly to instantly select the columns best suited for a printed VFX report: Thumbnail, Name, Note, Marker Timecode, Clip, Clip Duration, and Frame Duration. Type and Color are deselected automatically.
- Click All columns to restore every column checkbox.
Printing to PDF
Open the exported HTML in your browser and choose File → Print → Save as PDF. The report is print-optimised: the Note column gets extra width, the Clip column is kept narrow, and borders are drawn for clean page rendering. For best results with many columns, choose Landscape orientation in the print dialog.
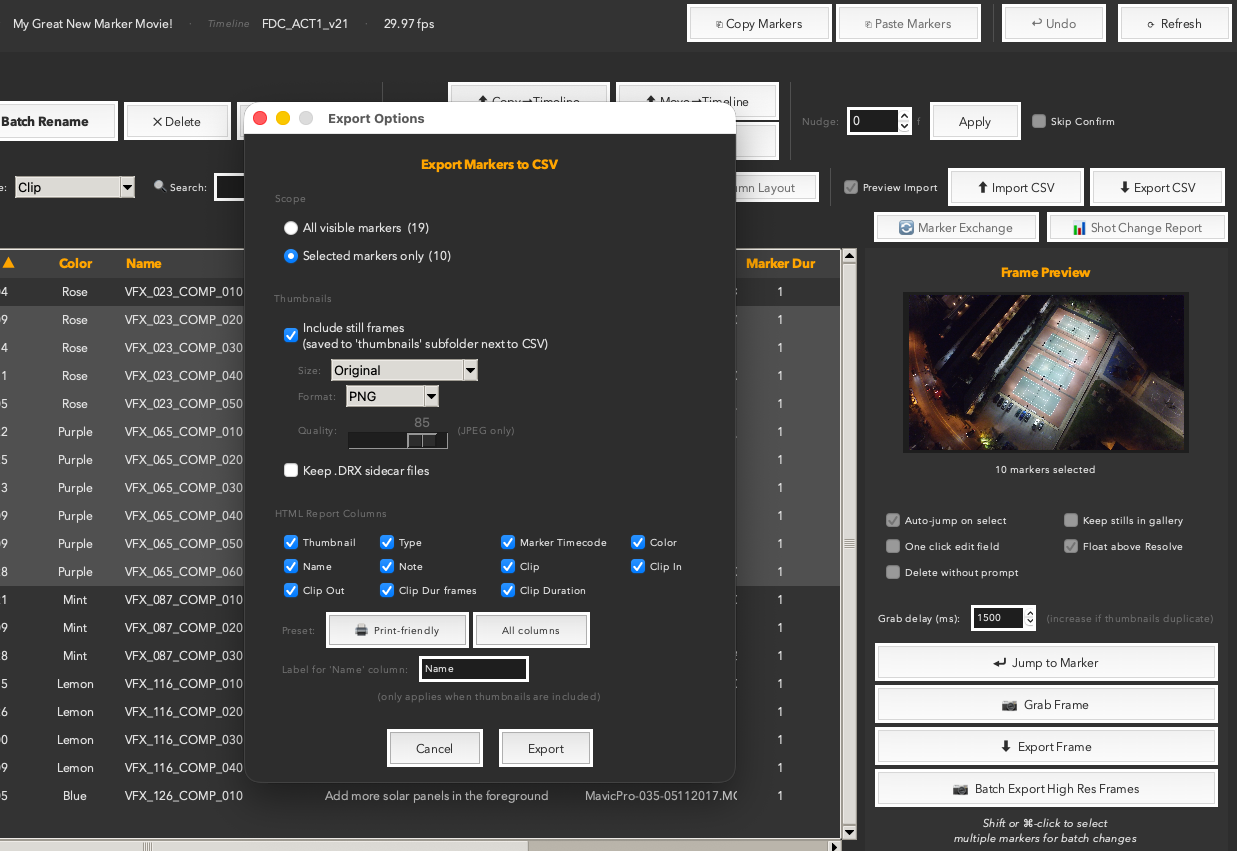
The Export dialog in action — a populated session with thumbnails enabled, ready to write the CSV and HTML report.
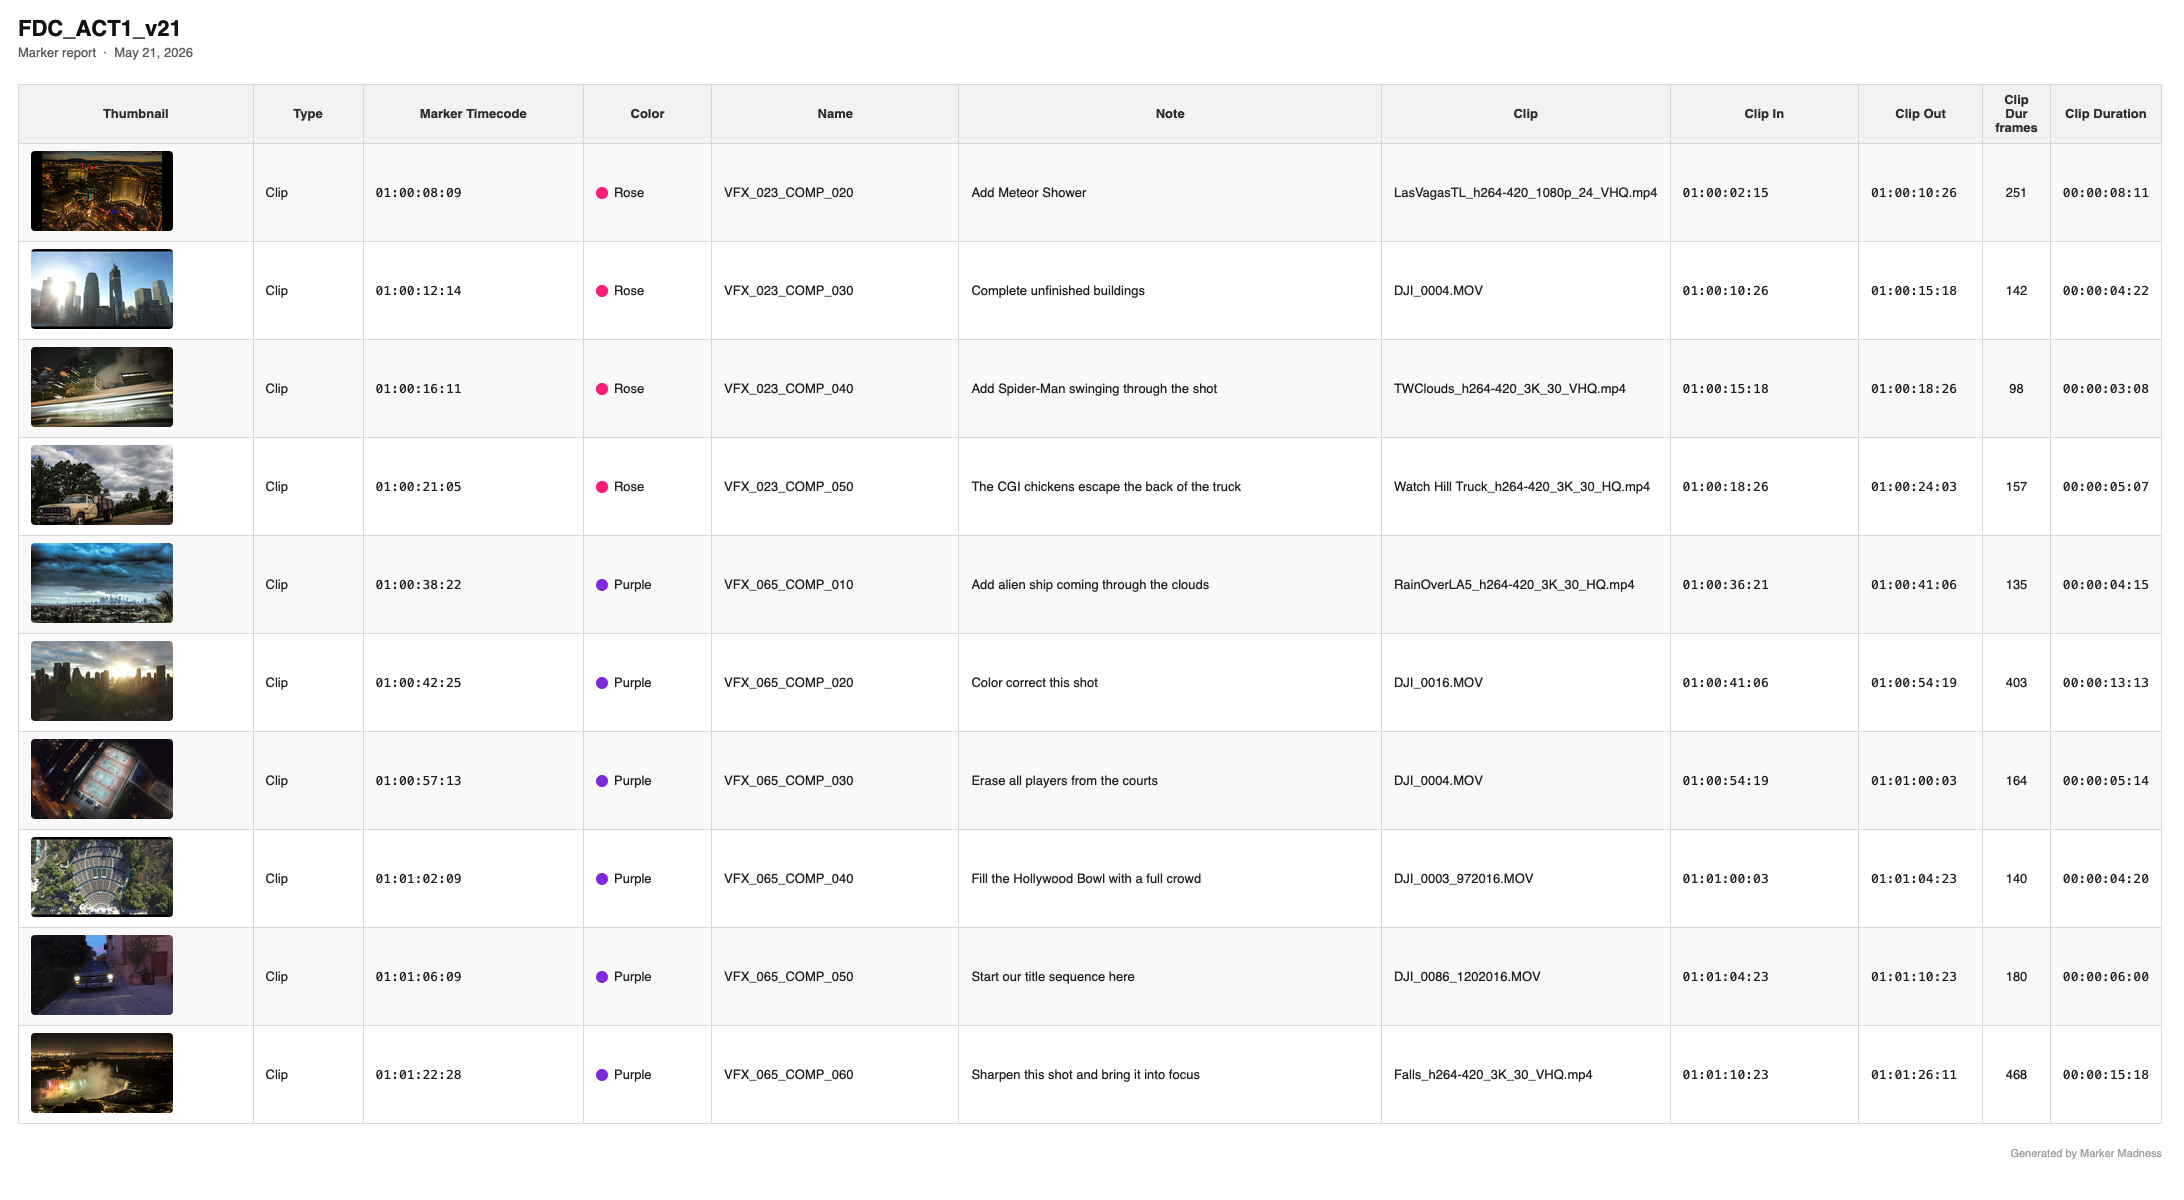
The generated HTML report open in a browser — thumbnails, color swatches, and all columns in one printable page.
Label for the Name column
By default the Name column header reads "Name." Type anything here to rename it — useful for client-facing reports where "Marker Name" or "VFX Shot" is more descriptive.
Export
Batch Export High-Res Frames
The 📷 Batch Export High Res Frames button in the right panel exports still frames for every marker without generating a CSV or HTML report — just the images, at full Resolve still quality.
- Choose a destination folder. Frames are named with a sequential prefix and the marker index.
- A progress bar shows the grab and export phases separately.
- A Cancel button lets you stop mid-batch. Already-exported frames are kept.
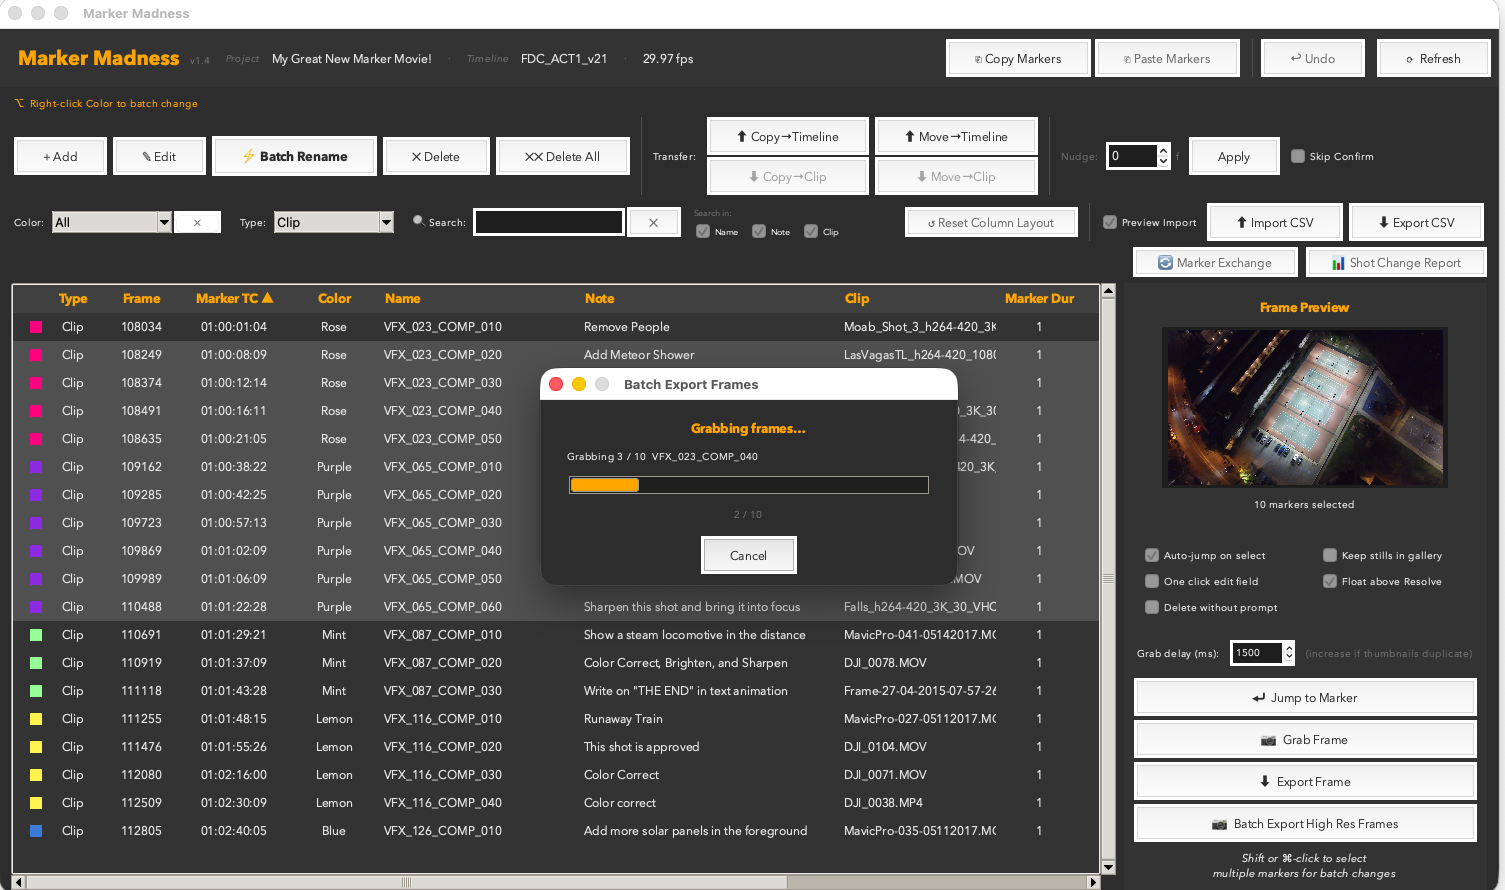
The Batch Export progress window — orange bar tracks each grab as Resolve seeks frame by frame through your markers.
Two-phase export
The batch exporter grabs all stills first (Phase 1), then exports each one to disk (Phase 2). This pattern is more reliable than interleaving seeks and writes, and the progress bar reflects both phases.
Analysis
Shot Change Report
The Shot Change Report compares two CSV exports — a Before and an After — and produces a diff showing which VFX shots changed duration, were slipped, were dropped, or are new. It's designed for VFX supervisors tracking editorial changes across versions.
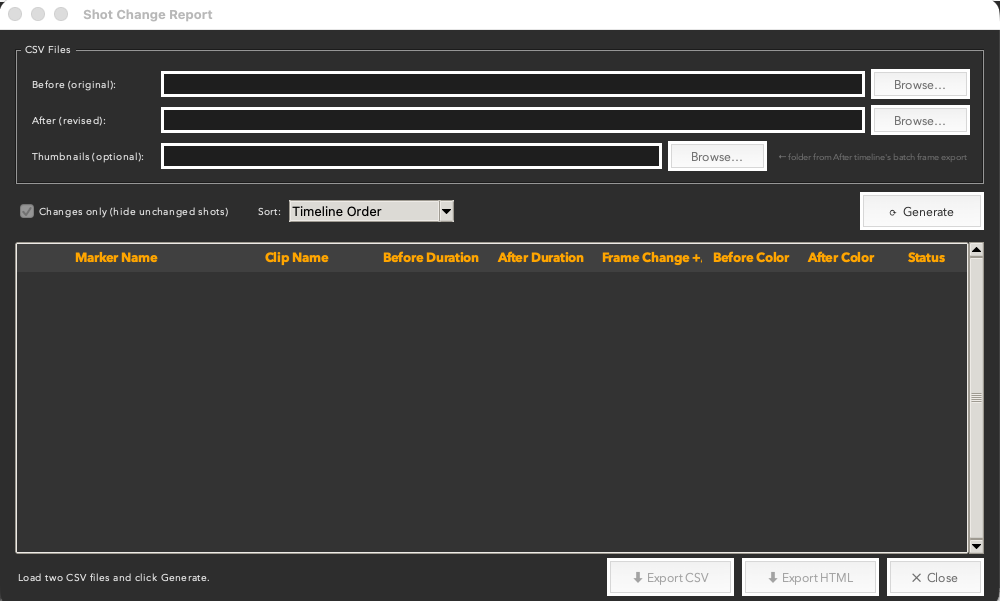
The Shot Change Report dialog — load two CSV exports and click Generate to diff them.
- Export a CSV from your timeline at version A. This is your Before file.
- After the editor makes changes, export another CSV. This is your After file.
- Open Shot Change Report from Toolbar Row 3. Load both files using the Browse buttons.
- Optionally point it at a Thumbnails folder (from a batch frame export of the After version) to include reference stills in the report.
- Click Generate. The table populates with every shot and its status.
- Filter, sort, and review the results. Export as CSV or HTML for distribution.
The Generate button — click it once both files are loaded. Results appear instantly.
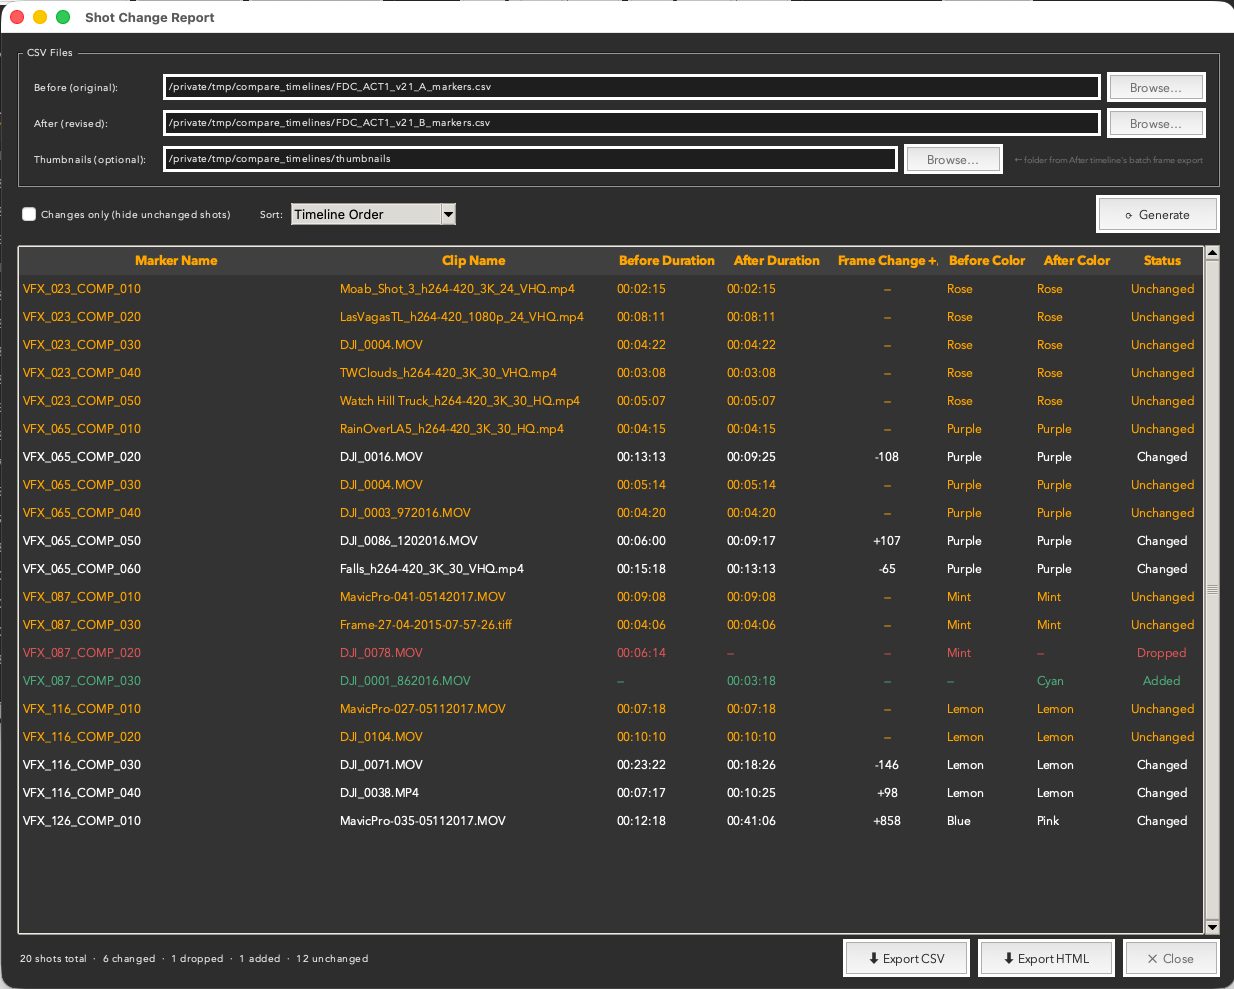
Results populated — Marker Name and Clip Name columns let you see exactly which clip each shot lives on.
Status values
- Added — shot exists in After but not Before.
- Changed — same name, different duration. Frame change shown as +/−.
- Slipped — same name, same duration, but the source material has shifted within the clip window. The Frame Change column shows how many frames the slip moved, and in which direction.
- Dropped — shot exists in Before but not in After.
- Unchanged — same name, same duration.
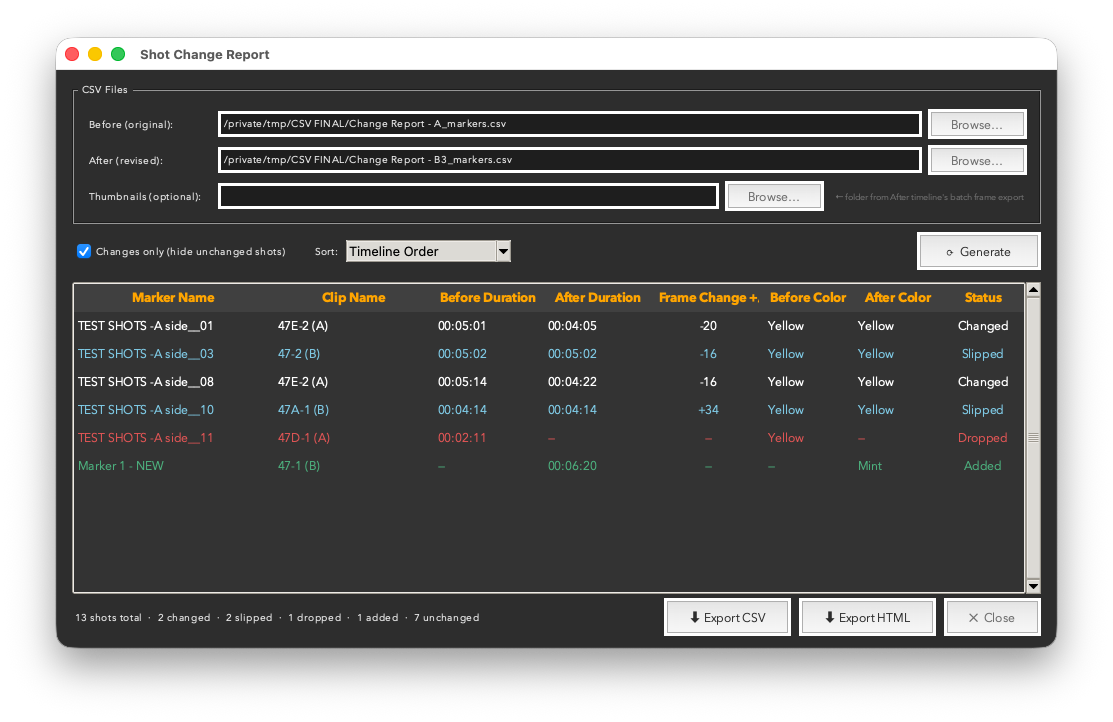
A report with all four change types present — two slipped shots shown in blue with their frame deltas, one changed, one dropped, and one added. The footer summarises each category.
Shots are matched by marker name + clip name together. If the same marker name appears on a different clip in the After timeline, it is treated as a new Added shot — not a match — so re-used names on new footage don't get lost in the diff. Unnamed markers fall back to timecode as the match key.
Filtering and sorting
The Changes only checkbox hides Unchanged shots so you can focus on what actually moved. This is usually the first thing to tick after a large diff populates.

The Changes only checkbox and Sort dropdown sit directly above the results table.
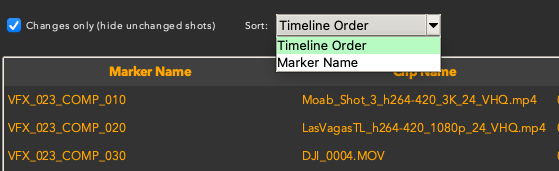
Sort by Timeline Order (default) or Marker Name — useful when you want to hunt alphabetically for a specific shot.
Results summary and export
The footer bar tells you everything at a glance — total shots, how many changed, how many were dropped, how many were added, and how many are unchanged. Export buttons are right there in the same bar when you're ready to share.

The results summary: total shots, changed, dropped, added, and unchanged — plus Export CSV, Export HTML, and Close.
HTML report
The HTML export is the best format for sharing with a VFX team. It opens in any browser, renders the color-coded status column, includes thumbnail frames if you provided a stills folder, and prints cleanly to PDF for archiving.
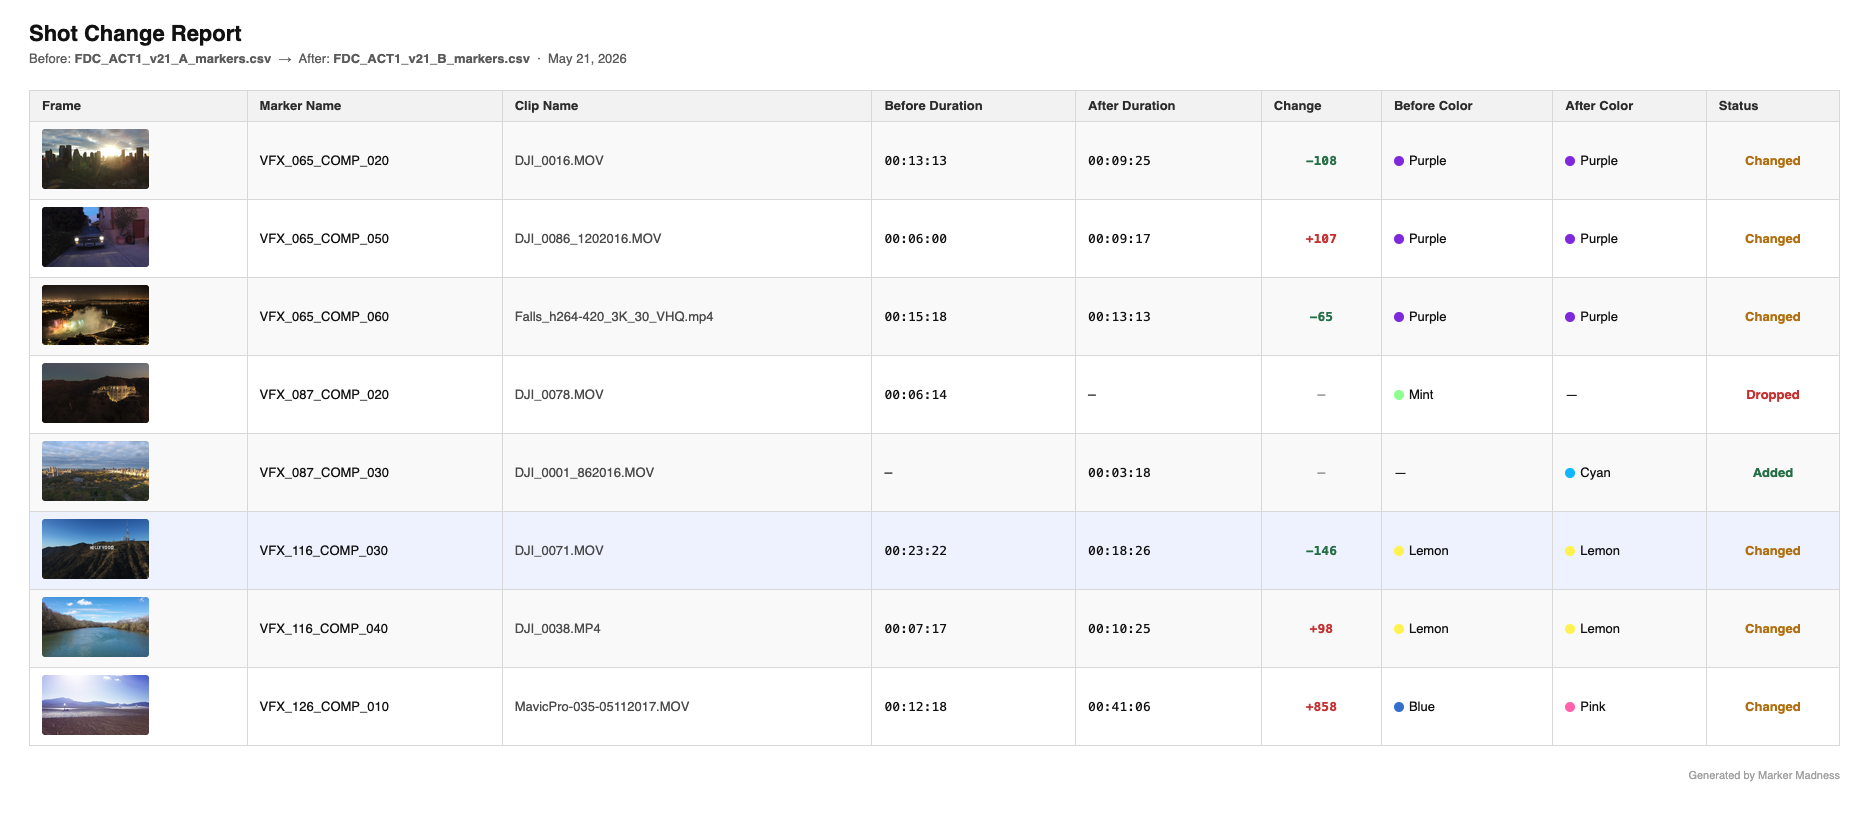
The exported HTML report open in a browser — color-coded status, thumbnail frames, and Clip Name column, ready to share or print to PDF.
Tips & troubleshooting
- Refresh your timeline before exporting. If you're working across multiple timelines, switching between them can leave stale marker data. Refresh the current timeline in Resolve before exporting your CSV to ensure the report reflects the actual state of the cut.
- Added shots require a marker. The Shot Change Report can only detect a new shot if a marker was manually placed on it before export. If a clip was added to the timeline but has no marker, it won't appear in the report. Placing a marker on every new shot is a required step if you want them tracked.
Integration
Marker Exchange
Marker Exchange is a bidirectional bridge between Resolve markers and other editing applications. Open it from the 🔄 Marker Exchange button in Toolbar Row 3.
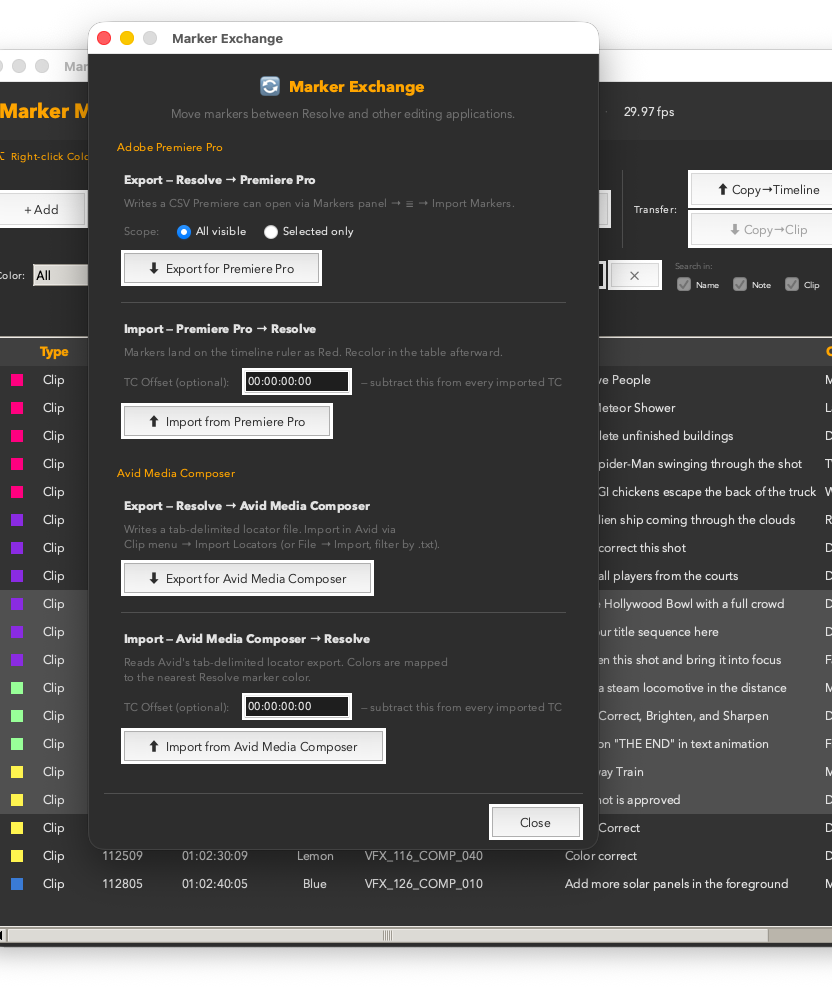
The Marker Exchange panel showing both Premiere Pro and Avid Media Composer sections.
Adobe Premiere Pro
Export → Premiere Pro writes a CSV file in Premiere's native marker format. In Premiere, open the Markers panel, click the menu (☰) and choose Import Markers.
Import from Premiere Pro reads a Premiere marker CSV and creates the corresponding markers on your Resolve timeline ruler. Colors are preserved where names match.
Avid Media Composer
Export → Avid writes a tab-delimited .txt locator file. In Avid, go to Clip menu → Import Locators to load the file.
Import from Avid reads Avid's tab-delimited locator export and maps locator colors to the nearest Resolve marker color automatically. Avid Blue, Cyan, Green, Yellow, Red, and White all have direct equivalents.
TC Offset
If your Resolve timeline and your Premiere/Avid sequence use different start timecodes (common when working with reels), enter the difference in the TC Offset field. This value is subtracted from every imported marker's timecode, landing them in the right place regardless of start-frame mismatch.
Scope
The All visible / Selected only radio buttons control what gets exported — respecting your current filters and selection.
Preferences
Settings & Preferences
All settings are saved automatically when you close the window and restored on next launch. There is no manual save step.
| Setting | What it does |
|---|
| Auto-jump on select | Moves the Resolve playhead to a marker's timecode whenever you select it in the table. |
| Keep stills in gallery | When off (default), grabbed stills are deleted from the Resolve gallery after export, keeping it clean. |
| One click edit field | Opens the inline name/note editor on a single click instead of a double-click. |
| Float above Resolve | Keeps the window on top of Resolve. Automatically drops back when you switch to any other app. Your on/off choice is saved and remembered between sessions. |
| Delete without prompt | Skips the "are you sure?" dialog when deleting markers. Use carefully. |
| Grab delay (ms) | Time between seeking to a marker and firing GrabStill(). Increase for heavy or high-res timelines. Adjust in 50ms steps; 150ms is the default. |
Column order, column widths, sort state, filter state, and window geometry are all also saved between sessions.
Reference
Keyboard Shortcuts
Main Table
| ↑ / ↓ | Move selection up or down one row |
| Return / Enter | Open Quick Edit bar for selected marker |
| Escape | Deselect all / close Quick Edit bar |
| ⌘A | Select all visible markers |
| ⌘Z | Undo last batch operation |
| Double-click Name/Note cell | Open inline editor for that cell |
| Right-click Color cell | Open color picker for selected markers |
Quick Edit Bar
| Tab | Cycle between Name and Notes fields |
| Return | Save and advance to next marker |
| ↑ / ↓ | Save and jump up or down one marker |
| Escape | Save and close the bar |
Inline Editor
| Return / Tab | Save and close |
| Escape | Discard changes and close |
| Right-click | Cut / Copy / Paste / Select All |
All Text Fields
| Right-click | Cut / Copy / Paste / Select All context menu |