Getting Started
Installation
Reel Time Plus runs as a standalone app — it does not require DaVinci Resolve to be open. It's a single .py file that launches its own window. The standalone .app / .exe builds need nothing at all — the .py version requires a free Python 3 install.
Before You Start — Python 3
DaVinci Resolve only runs .py scripts if Python 3 is installed on your machine. Download the free installer from python.org/downloads. If you feel more comfortable getting it through Resolve directly, open the console (Workspace → Console) — when Python isn’t detected, Resolve shows a link to the same Python 3 download.
Running as a script inside Resolve
- Download Reel Time Plus 1.2.py from the suite download page.
- Copy it to:
~/Library/Application Support/Blackmagic Design/DaVinci Resolve/Fusion/Scripts/Utility/
On Windows: C:\ProgramData\Blackmagic Design\DaVinci Resolve\Support\Developer\Scripting\Scripts\Utility\
- Open DaVinci Resolve. From the top menu choose Workspace → Scripts → Utility → Reel Time Plus 1.2.
- The window opens independently — you can work in it without an active timeline or project.
Running as a standalone app (Mac)
- Download Reel Time Plus 1.2.app (the standalone build) from the suite download page.
- Unzip and drag it to your Applications folder.
- Double-click to open — no Resolve required.
Projects are saved as .json files on your computer. They persist between sessions and are completely independent of any Resolve project.
Interface
The Projects Screen
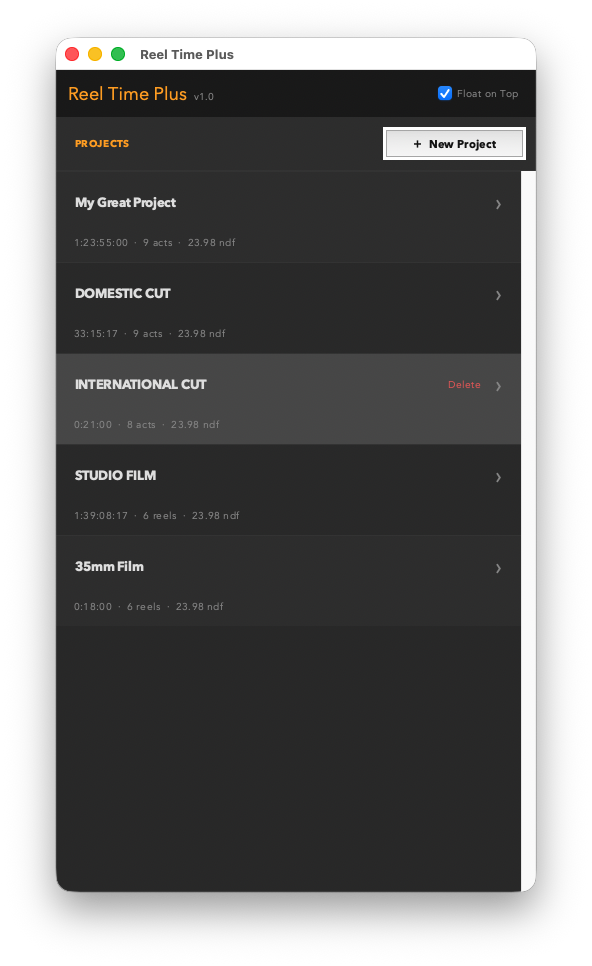
When Reel Time Plus opens, it shows the Projects screen — a list of every saved project. Each entry shows the project name, total running time, number of acts, and frame rate.
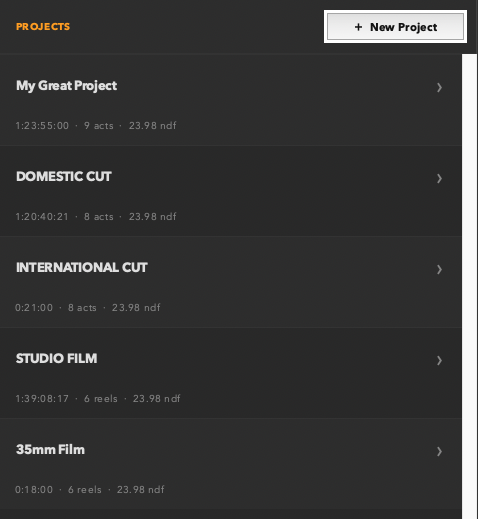
The Projects screen — each card shows the project name, total time, act count, and FPS at a glance.
- Click any project card to open it and go to the main timing screen.
- Click + New Project in the top right to create a fresh project.
Open to Projects preference
By default, Reel Time Plus reopens directly to the last project you had open. If you prefer to always land on the Projects list instead, tick Open to Projects in the title bar — the setting is saved and applies from the next launch onward.
Setup
Creating a New Project
Click + New Project from the Projects screen to open the setup dialog.
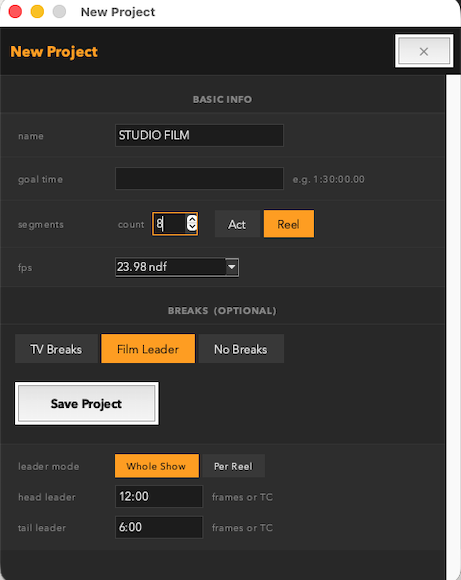
The New Project dialog — set name, goal time, segment count and type, FPS, film format, and break style before saving.
| Field | What it sets |
|---|
| Name | The project name shown on the Projects screen. |
| Goal time | Your target running time in HH:MM:SS:FF format. This is what the over/under is measured against. |
| Segments | How many acts or reels to start with. Choose Act or Reel as the segment label — this is purely a display preference. |
| FPS | The frame rate for timecode calculations. Choose from 23.98, 24, 25, 29.97 df, 29.97, 30, and more. FPS is locked after saving — create a new project if you need a different rate. |
| Film format | Choose Digital, 35mm, or 16mm. Film formats unlock the Feet+Frames view and spot-check. See Film Format below. |
| Breaks | Choose TV Breaks, Film Leader, or No Breaks. Sets the default break configuration — configurable per project after saving. |
Click Save Project to create it. The app goes directly to the main timing screen.

Film Leader selected — the leader mode and head/tail duration fields appear below the break type buttons.
FPS is locked after creation
Frame rate affects how timecode addition and subtraction work. Once a project is saved you can't change the FPS — if you need a different rate, create a new project. All other settings are editable at any time.
Interface
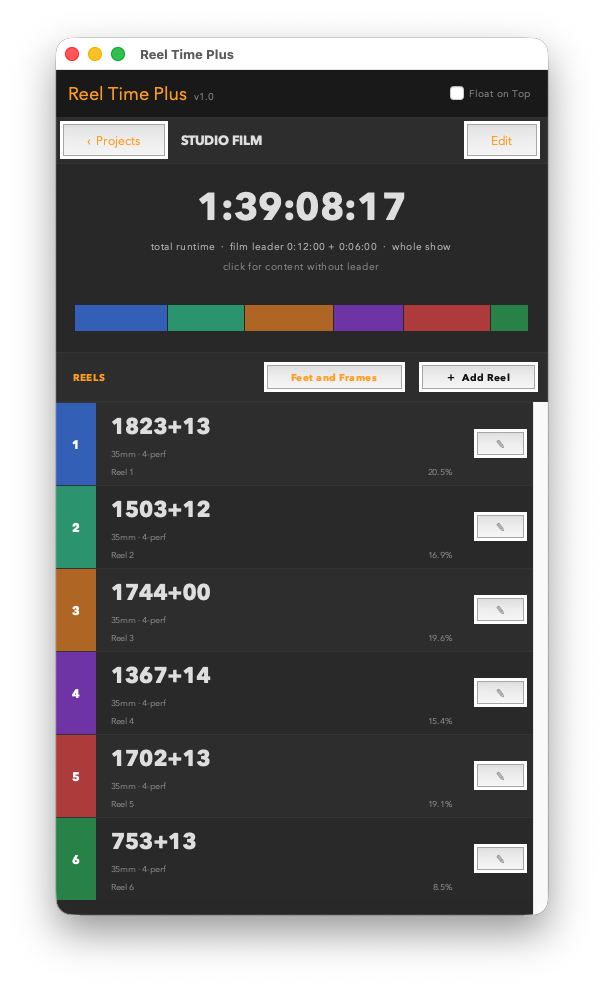
The Main Timing Screen
The main screen is divided into three zones: the time display at the top, the segment color bar below it, and the acts list filling the rest of the window.
The main screen — large time display, over/under indicator, visual segment bar, and the numbered acts list.
The Time Display
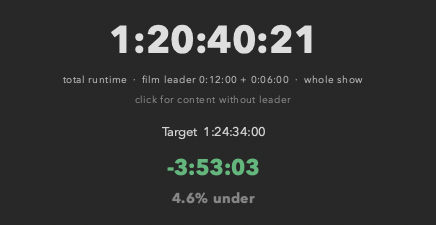
The large clock at the top shows either content runtime or total runtime with breaks. Click the number to toggle between the two views.
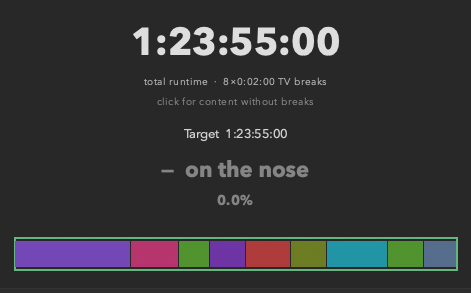
On the nose — total runtime with breaks matches the goal exactly. The label and percentage confirm zero over/under.
- Content runtime — the sum of all act durations only, no breaks or leader.
- Total runtime with breaks — content plus all configured breaks and leader. This is what the audience actually experiences.
- The subtitle lines below the clock show your content runtime and the break contribution so you can see both at a glance.
- Target — always shows your goal time for reference.
Navigation
- ‹ Projects button — returns to the Projects list without losing any data.
- Edit button — opens the Edit Project dialog to change name, goal time, segment count, breaks, or break duration.
- Float on Top checkbox — keeps the window visible above other apps while you work in Resolve or a spreadsheet.
- Open to Projects checkbox — when ticked, the app will open to the Projects list on next launch instead of returning to this project.
Features
Acts & Reels
The acts list occupies the lower half of the main screen. Each act has a number, a color swatch, a name (optional), a duration, and a percentage of the total.
The segment list — each row shows a color swatch, act name, duration in the active display mode, and a percentage of total runtime.
- Duration — shown in timecode, feet+frames, or frames depending on the active view mode. Click the duration to edit it.
- Percentage — shown in small text below the duration. Shows what share of the total runtime this act represents.
- Color swatch — each act gets a distinct color that corresponds to its segment in the visual bar above. Set a custom color in the Edit Segment dialog.
- + Add Act — adds a new act to the bottom of the list with a zero duration. Edit its duration to start accumulating time.
Tip
You can have as many acts as you need. For a long-form documentary or a multi-reel film, just keep adding. Each act's percentage updates in real time as you edit durations.
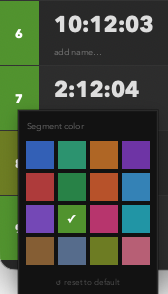
The color picker — click any act's color swatch to choose a custom color from the grid. The chosen color maps directly to that act's block in the segment bar above.
Editing a Segment
Click any act's duration to open the Edit Segment dialog. You can set the act name, pick a color, and enter a duration in your preferred format.
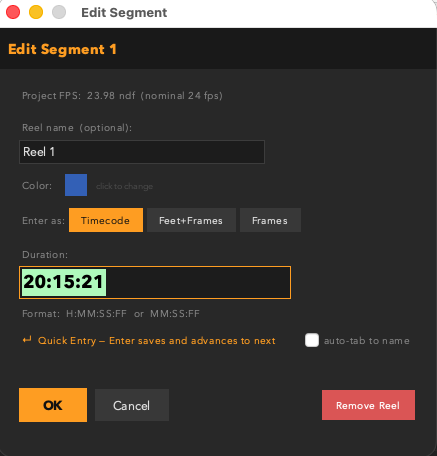
The Edit Segment dialog — name, color, and duration with format toggle. Film projects include a Feet+Frames input mode.
- Timecode — enter as
H:MM:SS:FF, H:MM:SS.FF, or compact MM:SS.
- Feet+Frames — enter as
feet+frames, e.g. 1234+08. Only available on 35mm and 16mm projects.
- Frames — enter a raw frame count. Useful when working from a cut list or frame-accurate EDL.
Quick Entry
When you have a list of durations ready — from a cut list, a spotting sheet, or your own notes — Quick Entry lets you fill in all your acts without touching the mouse.
- Click the first act to open the edit dialog.
- Type the duration in timecode format (
H:MM:SS:FF).
- Press Enter (or the numeric keypad Enter). The act saves and the next act's dialog opens automatically with the duration field selected.
- Type the next duration and press Enter again. Repeat down the list.
- The last act saves and closes normally — no next to advance to.
Quick Entry
The dialog shows an orange ↵ Quick Entry hint when there's a next act to advance to, so you always know it's active. Clicking OK instead of pressing Enter saves the current act without advancing.
Features
Breaks & Leader
Reel Time Plus adds configured breaks to the content runtime to give you a true broadcast or theatrical total. The break style is set when you create the project and can be changed in Edit Project.
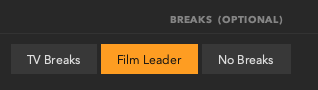
The break type selector in Edit Project — choose TV Breaks, Film Leader, or No Breaks. Additional fields appear below depending on your selection.
| Mode | What it adds |
|---|
| TV Breaks | Adds one commercial break between each act. Set the break duration in frames or as a timecode (e.g. 48 frames or 0:02:00). The label shows N × break duration. |
| Film Leader | Adds head and tail leader. Whole Show mode: one head + one tail for the full deliverable. Per Reel mode: head and tail on every individual reel — right for DI delivery. |
| No Breaks | Total runtime equals content runtime — no breaks or leader added. |
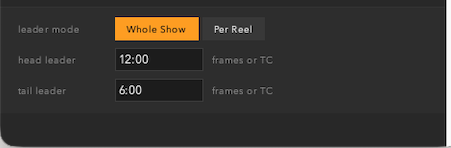
Film Leader fields — set head and tail leader durations in frames or timecode. Leader mode toggles between Whole Show and Per Reel.
The break total is always visible in the subtitle lines beneath the main clock. Click the clock to switch between content runtime and total runtime views.
Features
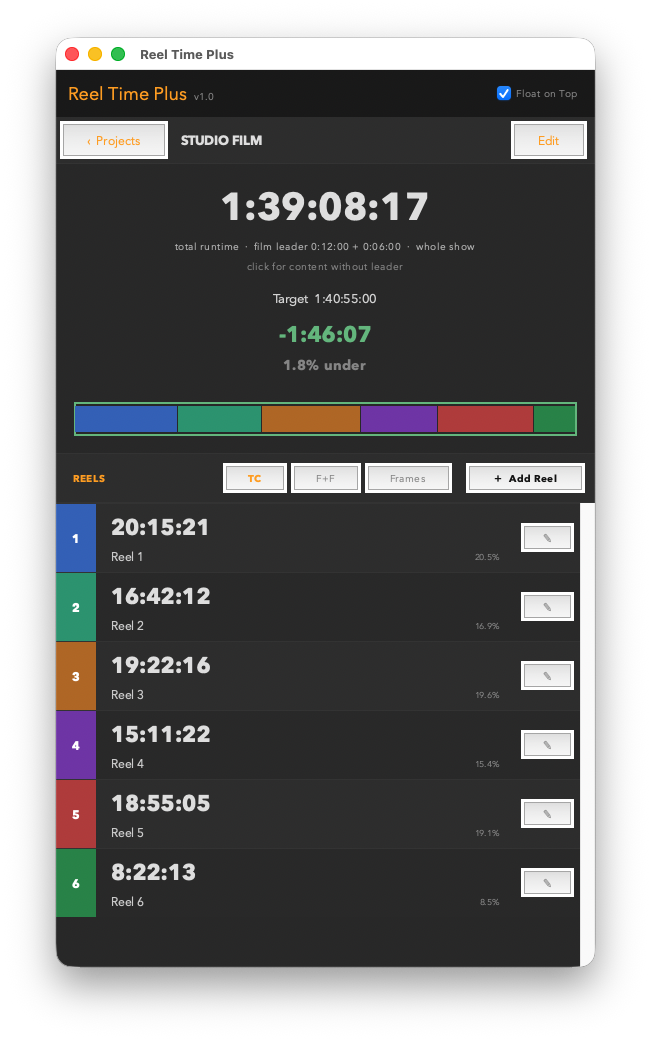
Over / Under Display
Reel Time Plus compares the current total runtime against your goal time and shows the difference in three ways: a timecode readout, a percentage, and the segment color bar.
On the nose — total runtime matches the goal exactly. The label and percentage confirm zero over/under.
Under time — the deficit shows in green with a − prefix and a percentage. The segment bar shows the gap before the goal.
| State | Display |
|---|
| On the nose | Shows "— on the nose" and 0.0% in neutral white. The total matches the goal exactly. |
| Over | Shows the excess in red with a + prefix (e.g. +0:44:00) and the percentage over. |
| Under | Shows the deficit in green with a − prefix and the percentage under. |
The Segment Color Bar
The horizontal bar just below the over/under display is a visual map of your project. Each colored block represents one act — its width is proportional to the act's share of the total runtime. This gives you an immediate sense of pacing: acts that are too long visually dominate the bar.

The segment color bar — each act's proportional share of runtime shown in its assigned color. A dominant block signals an act that's running long.
Features
Editing a Project
Click Edit in the top right of the main screen to open the Edit Project dialog. All settings except FPS can be changed here at any time.
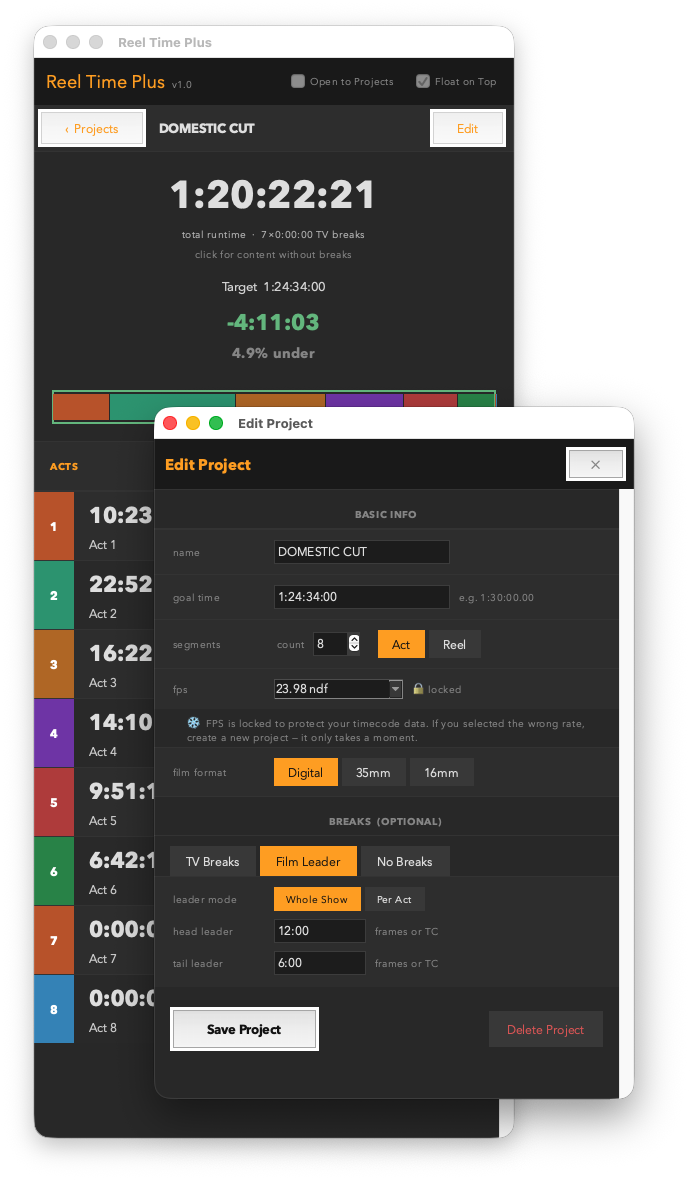
The Edit Project dialog — change name, goal time, segment count, film format, break style, and break duration. FPS is locked and shown as read-only.
- Name — rename the project. Updates immediately on the Projects screen.
- Goal time — change the target. The over/under recalculates as soon as you save.
- Segments — increase or decrease the act/reel count. Adding segments creates new zero-duration acts; removing them deletes from the bottom of the list.
- FPS — shown as locked. If you need a different frame rate, create a new project.
- Film format — switch between Digital, 35mm, and 16mm at any time. Affects feet+frames display and conversion.
- Breaks — switch between TV Breaks, Film Leader, and No Breaks at any time. The total runtime updates immediately.
- Break duration — enter in frames (
48) or as timecode (0:02:00). Only visible when TV Breaks or Film Leader is selected.
- Delete Project — permanently removes the project. Cannot be undone.

Delete Project — available at the bottom of the Edit Project dialog. The action is immediate and cannot be undone.
Click Save Project to apply all changes.
Best Practices
Pro Tips
Set goal time to your deliverable, not your content target
For a TV show with a 42:30 content target and 8 × 2:00 breaks, set your goal to the total slot time (58:30). Switch the clock to Total Runtime view and you'll see exactly whether you fill the slot — no mental arithmetic needed.
Keep the window floating above Resolve
Enable Float on Top and position the window in a corner. As you trim and reorder in the timeline, manually update the act durations in Reel Time Plus — the over/under tracks your edits in near-real time. It's a lightweight alternative to checking Resolve's timeline ruler constantly.
Use acts to model act structure, not just screen time
In a three-act feature, use three acts and set each duration to your target act length. The color bar immediately shows whether your structure is balanced — a dominant first act or a short third act is visible at a glance without looking at a spreadsheet.
Click the clock to toggle views mid-meeting
In a production meeting, someone will ask "but how long is it with commercials?" Click the clock once to switch to Total Runtime, answer the question, click again to go back to content runtime. No recalculating, no opening another app.
Film editors: use Feet+Frames with spot-check
Set your project to 35mm or 16mm and switch to F+F view to match your cut list. Keep the view in TC for the producer review, then right-click any reel to spot-check feet+frames for that one segment when you're back at the bench. Both views coexist — you never have to choose permanently.
Duplicate a project for version comparison
Create a second project with the same name + "v2" to model a re-cut. Compare the Projects screen cards side by side — the total times update as you edit durations in each. Useful for presenting two editorial versions to a producer.